
If you’re migrating your WordPress site to HostWP.io or setting up a new project, you need a way to test the installation and content on our servers before you update your domain’s public Nameservers.
Since your domain’s live traffic is currently directed elsewhere, this guide provides multiple simple, effective methods to establish a temporary connection or create a dedicated staging environment.
This allows you to preview, perfect, and launch your site with confidence!
Method 1: Built-in Temporary Domain
When you sign up for HostWP.io, your primary domain is automatically set to look for files in the public_html directory. If your domain’s Nameservers haven’t been updated yet with HostWP nameservers, then you can use a Temporary Domain to build and test your site on our servers immediately.
Step 1: Create Temporary Domain
- Log in to your cPanel
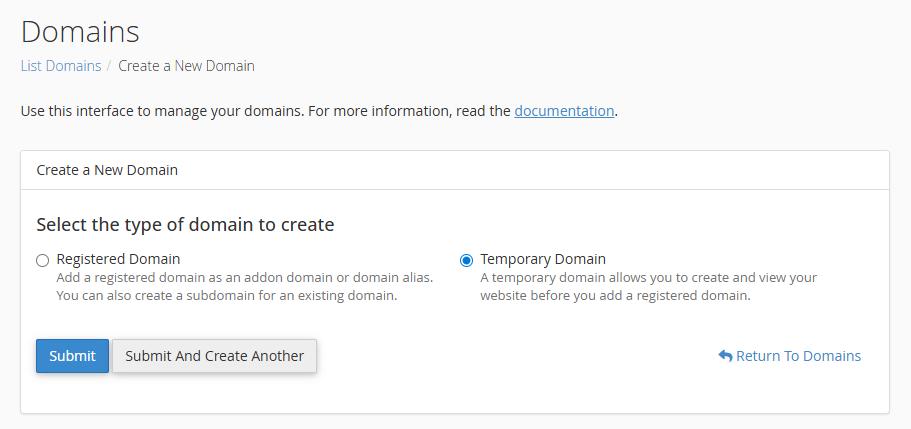
- Navigate to Domains -> Create a New Domain
- Select the Temporary Domain and hit the Submit button.
Step 1: Install WordPress
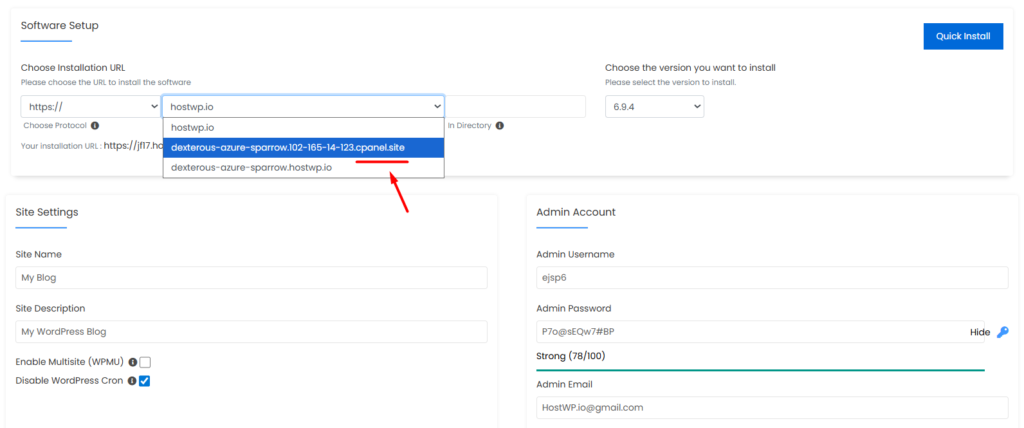
- Open the WordPress Manager from the left-hand menu.
- Click Install and select your Temporary Domain ending with cpanel.site
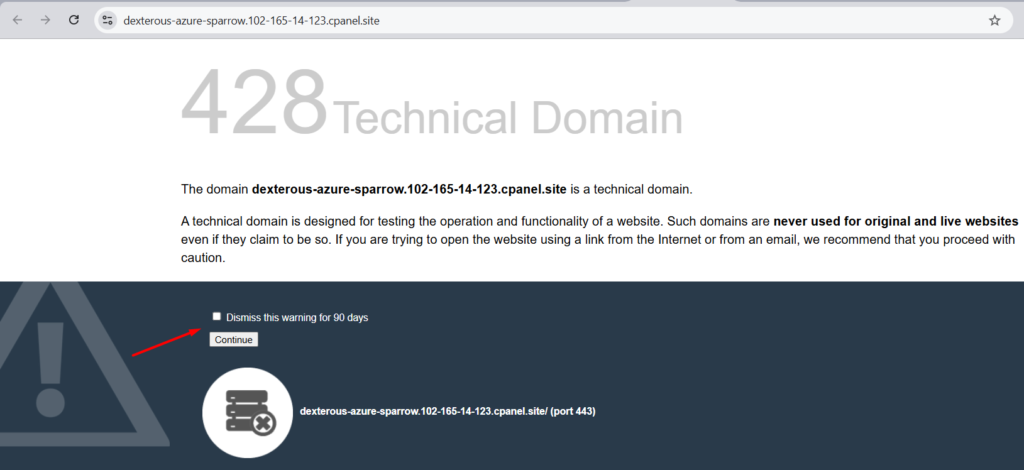
Step 3: Access WordPress on Temporary Domain
Your domain is up and running. The last step is to ignore the warning, check “Dismiss this warning for 90 days” and click “Continue”.
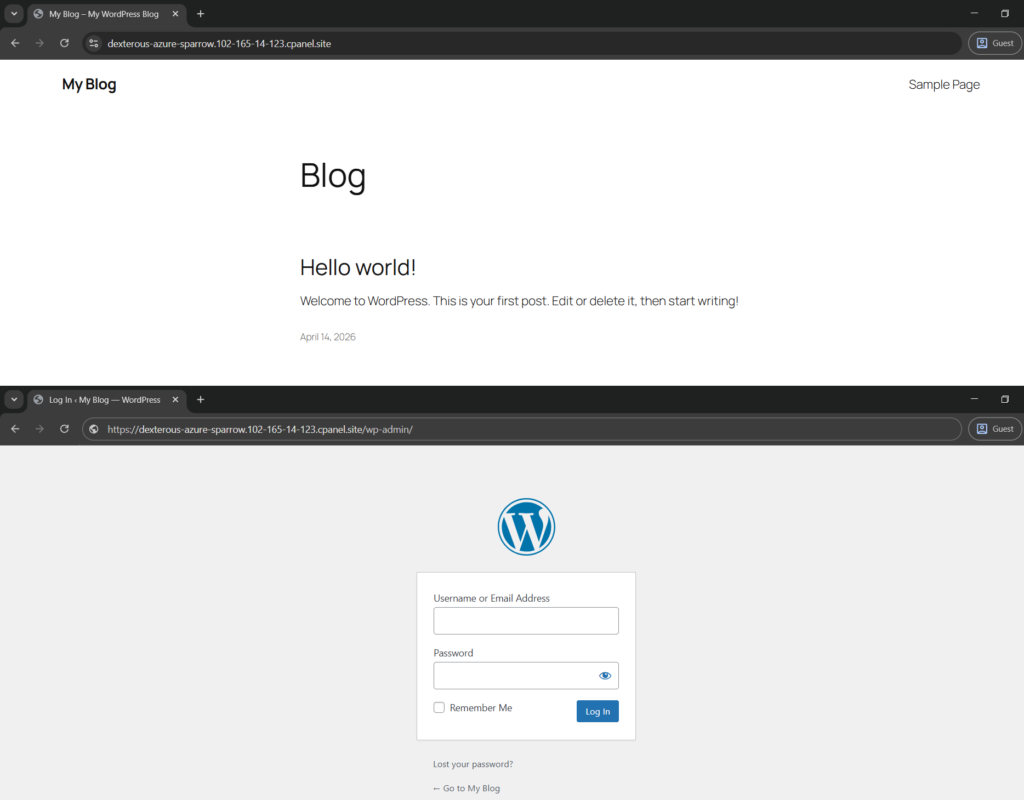
Your Temporary Domain on cPanel is now up and running. You can use it to build or test websites, migrate existing websites, and so on. Access the WordPress admin at /wp-admin/
Method 2: Using Subdomain (Active Site Elsewhere)
If you have an active website hosted somewhere else and have recently signed up with HostWP.io, your domain is already added to your new account, but the Nameservers have not been updated yet.
You need a way to access and test your WordPress installation on our server before making the final switch.
To do this, you will temporarily use a subdomain and a specific DNS record:
Steps for Accessing the Site Using a Subdomain
- Find Your HostWP Server IP:
- Log in to your HostWP.io cPanel and find the “Shared IP Address” listed in the sidebar. Copy this address.
- Create a Staging A Record:
- Log in to your current domain registrar/DNS provider (where your Nameservers currently point).
- Create a new A Record that points to a temporary sub-domain (like
stageordev) to the HostWP.io server IP:- Type:
A - Name/Host:
stage(ordev) - Value/Points To: Your Shared IP Address (e.g.,
102.165.xx.xxx).
- Type:
- Add the Sub-domain to cPanel:
- Once the A record is set, log back into your HostWP.io cPanel.
- Navigate to Domains and add the full staging domain (e.g.,
stage.yourdomain.com). This tells our server to host the site.
- Install/Migrate: Now you can install WordPress from the WordPress Manager on the left, develop, or migrate your existing site to
stage.yourdomain.com.
You can now view and test your site privately at https://stage.yourdomain.com without affecting the live site hosted elsewhere.
Method 3: Use built-in “Website Preview” Feature (Simple but Limited Time Access)
HostWP.io’s built-in “Website Preview” allows you to quickly view your WordPress installation.
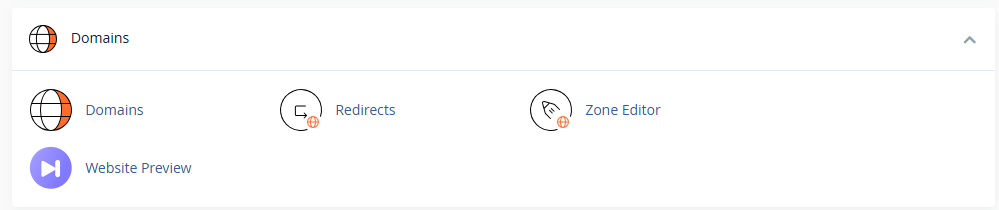
- Navigate to cPanel -> Website Preview
- Click on the “Create” button beside your domain name.
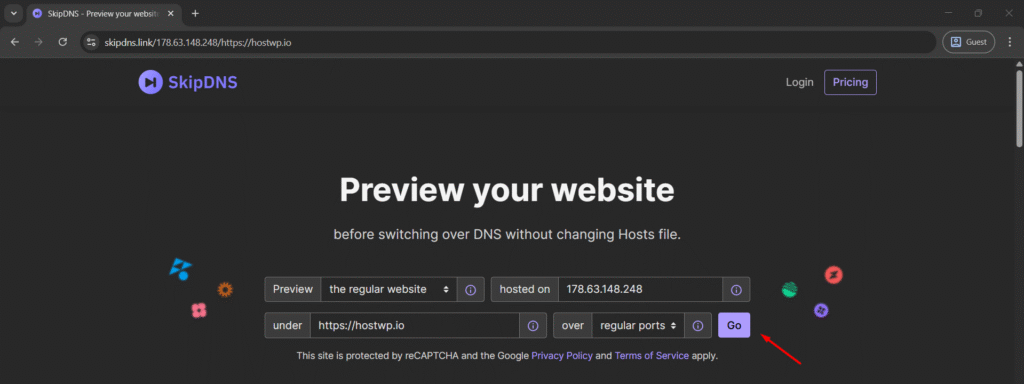
- A new tab will open, click on the “Go” button, and it will create a temporary link to view your website.

Method 4: Use the LiveHosts Chrome Extension (Easy)
This method uses a browser extension to locally override your domain’s DNS resolution, allowing you to preview the site on our server IP without changing the Nameservers.
- Install the Extension:
- Visit the LiveHosts extension page: Chrome Extension | Firefox Extension
- Add Extension to your browser.
- Find Your Server IP:
- In your cPanel dashboard, look for the “Shared IP Address” listed in the right sidebar. Copy this IP address. (e.g.,
102.165.xx.xxx).
- In your cPanel dashboard, look for the “Shared IP Address” listed in the right sidebar. Copy this IP address. (e.g.,
- Configure the Override:
- Click the LiveHosts extension icon in your browser toolbar.
- Type your domain name in “Hostname” and Server IP in the “IP” field.
- Click the “Add” button.
- View the Site:
- Open a new browser tab and navigate to your domain like this: example.com/?no-cache (The no-cache ensures your browser is bypassing the cache)

How It Works
The LiveHosts extension acts as a temporary, browser-specific Hosts File override. Your computer still sees the public DNS, but the browser is told to load the site from the specific HostWP.io server IP address.
Method 5: Modify Your Local Hosts File (Permanent Local View)
This advanced method is recommended if you need a reliable, longer-term viewing solution for a single computer. It tells your computer to permanently associate your domain with our server IP.
- Find Your Server IP: As in Method A, copy your “Shared IP Address” from the cPanel right sidebar.
- Edit the Hosts File (PC/Windows):
- Open the Start Menu.
- Type “Notepad” and Right-Click the app, then select “Run as Administrator.”
- In Notepad, go to File -> Open.
- Change the file type filter to “All Files” next to “File name:”.
- Navigate to:
C:\Windows\System32\Drivers\etc - Select the file named hosts and click Open.
- Add the following line at the very bottom:
102.165.xx.xx example.com(Replace the IP with your server IP and example.com with your domain name)
- Save the file.
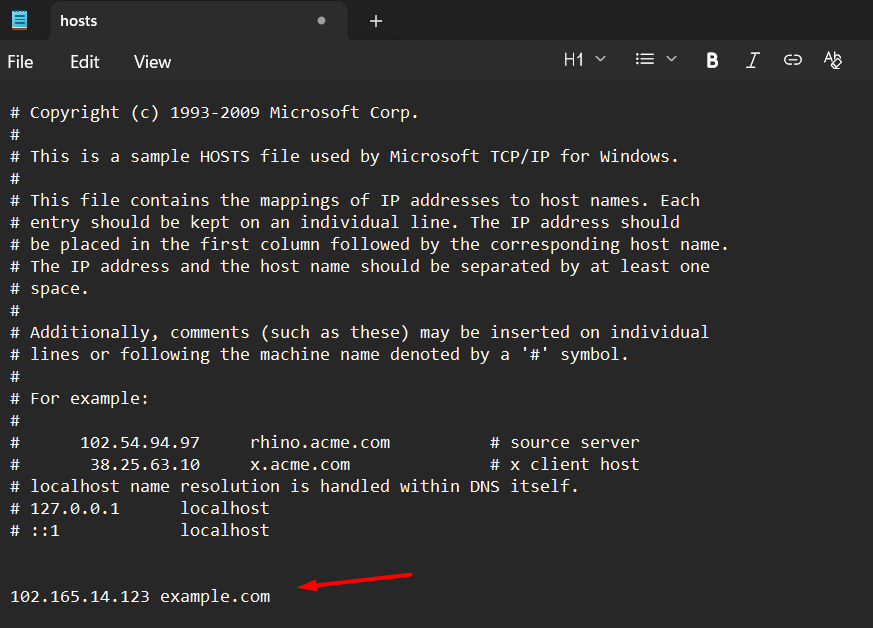
View the Site: Close and re-open your browser, or try viewing the site in an Incognito/Guest Window to bypass local cache.
⚠️ Important Host File Note: This change is local to your computer only. You MUST manually delete this line from the hosts file once you’ve successfully updated your Nameservers and verified your site is loading correctly.
Method 6: Advanced Methods for Client Development & Staging
If your main domain is already pointing to HostWP.io (i.e., you have updated your Nameservers), you can use these methods to build client websites or staging environments for client domains.
Option A: Using a Subdirectory for Client Projects
This is the fastest method to start building a client project when you already have an active website on your main domain (e.g., agency.com).
How It Works
You will install a new, separate WordPress site inside a folder (or sub-directory) of your existing domain, such as agency.com/client-project. The site is live instantly under this URL and is completely isolated from your main website’s files.
Steps to Install WordPress in a Subdirectory
- Log in to cPanel.
- Open WordPress Manager from the left pane.
- Click “Install” to begin a new WordPress installation.
- In the “Software Setup” section:
- Select your active domain (e.g.,
agency.com). - In the “In Directory” field, type the client’s name or project name (e.g.,
client1).
- Select your active domain (e.g.,
- Complete the installation. Your client project will be accessible at:
http://agency.com/client1
Option B: Using a Sub-domain for Dedicated Environments
This is the preferred method for long-term development, as it creates a unique, dedicated address for each project (e.g., client1.agency.com).
Scenario B-1: Developing on Your HostWP Domain
This is for when you want to build a client site on a sub-domain of your own existing domain (agency.com).
How It Works
Since your domain is already using our Nameservers, creating the sub-domain in cPanel automatically updates the DNS (Zone Editor) to point to our server IP.
Steps:
- Log in to cPanel.
- Navigate to Domains and select “Create a New Domain”.
- Enter the sub-domain name (e.g.,
client1.agency.com). - Once the sub-domain is created, go to WordPress Manager and install WordPress directly onto the new
client1.agency.comaddress.
Advanced Tip (Wildcard): If you manage many client sites, you can set up a single Wildcard A Record (
A | * | [Your Server IP]) in your DNS Zone Editor. This makes any sub-domain (likeclient99.agency.com) available for instant use in cPanel without a manual setup for each one.
Scenario B-2: Creating Staging on Your Client’s Domain
This is for when you need a staging site on the client’s own domain name (e.g., stage.clientdomain.com), but their main website is still hosted elsewhere.
How It Works
Because the client’s main domain is not on HostWP.io yet, the client must make a small DNS change on their end only for the staging subdomain.
Steps (Requires Client Action):
- HostWP Customer Action: Locate and provide the client with your HostWP.io Shared IP Address (found in your cPanel sidebar).
- Client Action: The client (or their DNS provider) must create the following A record in their existing DNS system:
- Type:
A - Name/Host:
stage(orstaging,dev, etc.) - Value/Points To: The Shared IP Address you provided.
- Type:
- HostWP Customer Action: Once the client confirms the A record is set:
- Go to cPanel -> Domains and add the full staging sub-domain (e.g.,
stage.clientdomain.com). - Use WordPress Manager to install the staging site.
- Go to cPanel -> Domains and add the full staging sub-domain (e.g.,
This setup gives the client a private staging link (http://stage.clientdomain.com) to review the work without interrupting their live site.
Free Migration Service: Open a support ticket with your old hosting credentials. Our migration experts will handle the entire site migration for you, free of charge, and ensure everything is working before recommending you update the Nameservers.
Thank you for choosing HostWP.io!