
For developers and advanced users, managing files via standard FTP can be slow and insecure. At HostWP.io, we recommend using SSH (Secure Shell) and SFTP (Secure File Transfer Protocol).
By utilizing SSH Key pairs instead of traditional passwords, you gain a highly secure, encrypted connection to both your server terminal and files. This guide walks you through generating your secure keys in cPanel and configuring the Bitvise SSH Client.
Step 1: Generate and Authorize SSH Keys in cPanel
Before connecting, you must generate a cryptographic key pair inside your control panel and authorize it for server access.
- Log in to your HostWP.io cPanel account.
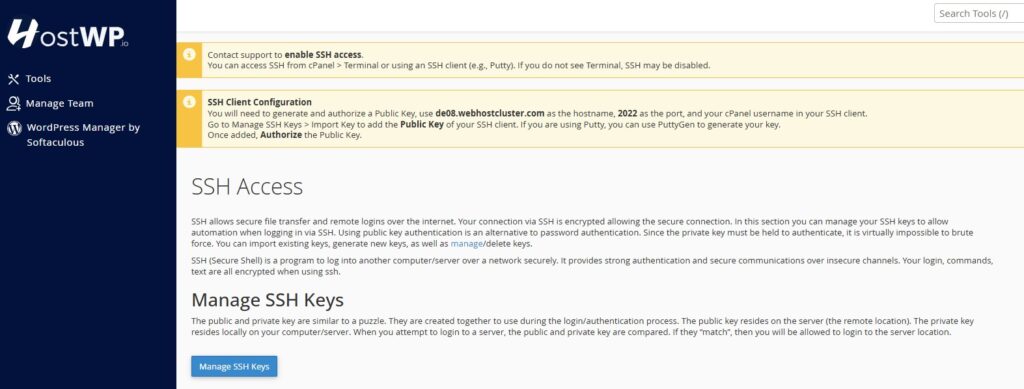
- Scroll down to the Advanced section and click on SSH Access.
- Click the Manage SSH Keys button.
- Click Generate a New Key. Leave the default settings as they are and simply click Generate Key.
- Click Go Back to return to the key management page.
- Under the Public Keys section, locate your new key, click Manage, and then click Authorize. Go back once completed.
- Under the Private Keys section, click View/Download next to your key.
- Scroll down to the conversion section, click Convert, and then download the converted private key file to your local machine.
Step 2: Configure Bitvise SSH Client
Bitvise is an industry-standard, high-performance client that provides an all-in-one interface for terminal commands and fast SFTP file transfers.
- Download and install the client from the official page: Bitvise SSH Client Download.
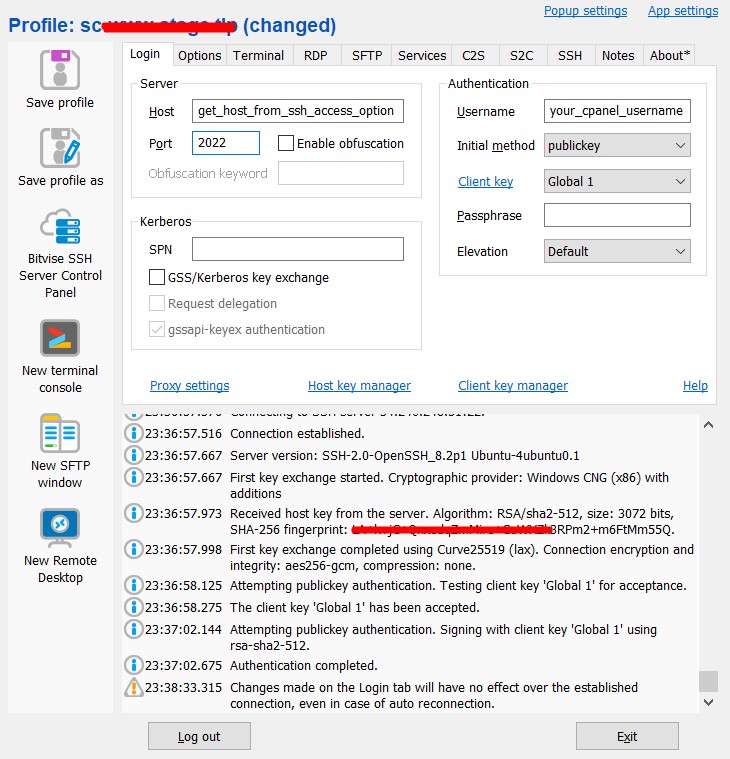
- Open Bitvise and navigate to the Login tab. Enter the following server details:
- Host:
de08.webhostcluster.com(Note: Check your New Account Information email if your account is hosted on a different server clusters). - Port:
2022 - Username: Your unique cPanel username
- Host:
- Look right below the login fields and click on Client Key Manager.
- Click Import and select the private key file you downloaded from cPanel in Step 1. Close the key manager window.
- Return to the main Login tab. Set the Initial method to publickey and in the Client Key dropdown menu, select the key profile you just imported (it will typically appear as Global 1 or Profile 1).
- Click the Login button at the bottom.
🎉 Success! Once connected, you can open Terminal window for command-line management and an SFTP window for lightning-fast, secure drag-and-drop file transfers.
Frequently Asked Questions (FAQs)
Why use Port 2022 instead of the default Port 22?
To protect our high-performance infrastructure against automated brute-force attacks, we isolate SSH traffic on a custom, secure port (2022). Standard connections on port 22 will time out.
Do I need to enter my cPanel password into Bitvise?
No. Because you selected your imported client key in the dropdown menu, the server authenticates your machine using cryptographic verification. This is significantly more secure than typing a raw password.
Can I give this key to my developer?
Yes. If you have an external team member managing your setup, you can securely send them the converted private key file along with the host and port details. You can instantly revoke their access at any time by going back to cPanel and clicking Deauthorize or Delete on that specific key.