
At HostWP.io, all accounts, websites, and email inboxes are automatically backed up via the premium service JetBackup 5. JetBackup 5 is included for free with all standard HostWP.io plans, giving you access to institutional-grade redundancy without any hidden costs.
Your data is securely isolated, encrypted, and duplicated to an off-site cloud storage server automatically:
- Daily off-site backups are retained for 30 days to ensure reliable long-term recovery.
You can download, view, or restore these snapshots directly from your cPanel at any time.
If you wish to maintain independent local copies, you can also schedule supplementary, site-level backups to your personal cloud (such as Google Drive or Dropbox) using plugins like UpdraftPlus.
Follow the steps below to learn how to access and restore HostWP.io backups.
Accessing JetBackup
- Log in to your HostWP.io cPanel account. Scroll down to the Files section and click on JetBackup 5 (or search for it in the top bar).
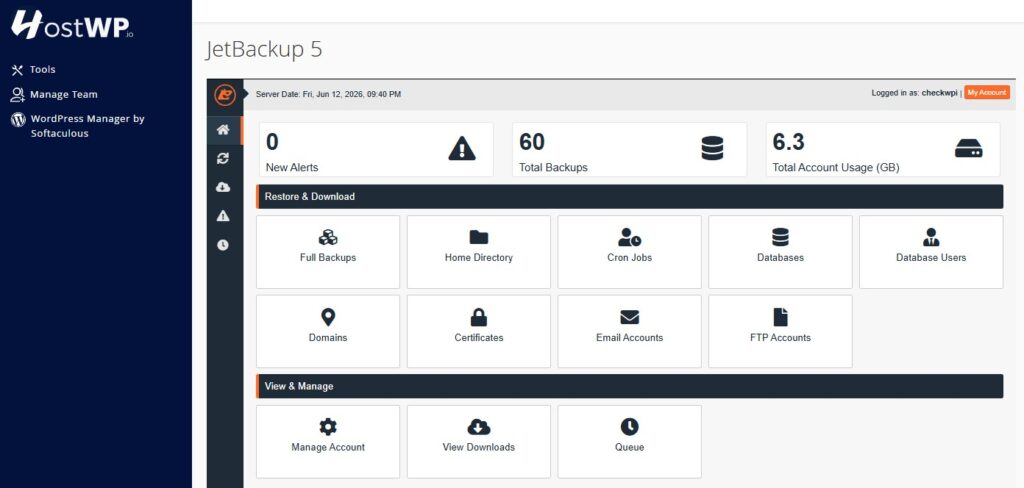
- You will see the JetBackup dashboard, displaying an overview of available restore points.
Option 1: Restoring Your WordPress Website
⚠️ CRITICAL NOTE: A WordPress website is made of two separate components: Files (plugins, themes, uploads) and a Database (posts, pages, configurations, users).
Restoring your files alone will not completely restore your website. If your site is broken, defaced, or missing content, you MUST perform BOTH steps below (File Restore AND Database Restore) from the same backup date to completely revert your site.
Option 1A: Restoring WordPress Files
If an update broke your theme, or you accidentally deleted an upload directory, follow these steps to restore your files:
- On the JetBackup dashboard, click on Home Directory, the backup date you wish to revert to, and click Change Files Selection.
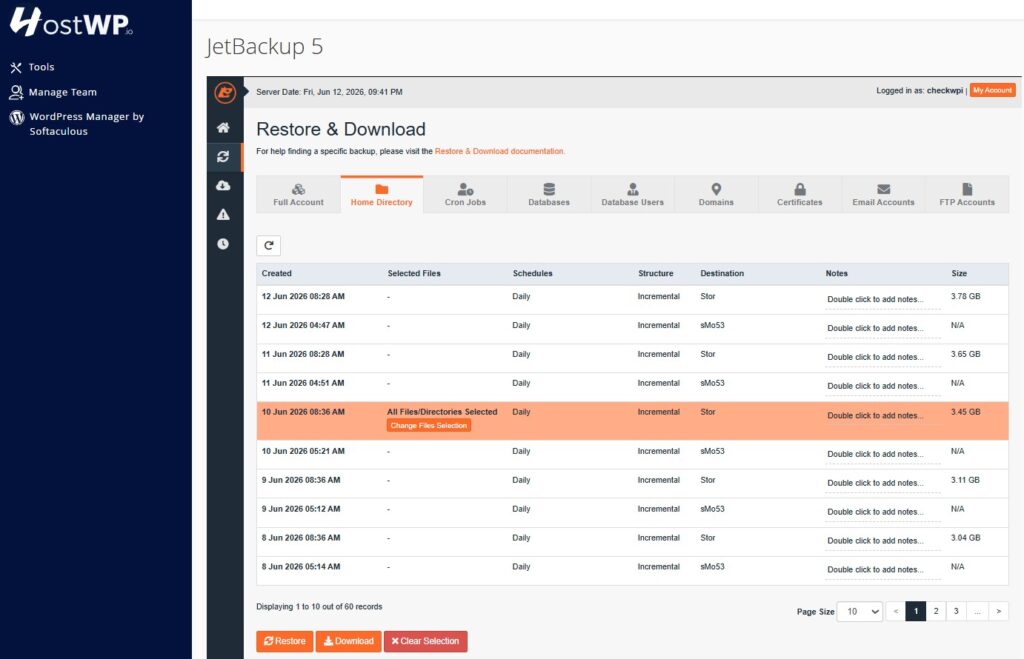
- You will see a list of all your files and folders. Navigate to your specific website’s directory: the primary website files are located inside public_html, while all other domains will have their own dedicated folders. Carefully select the folder for the website you want to restore.
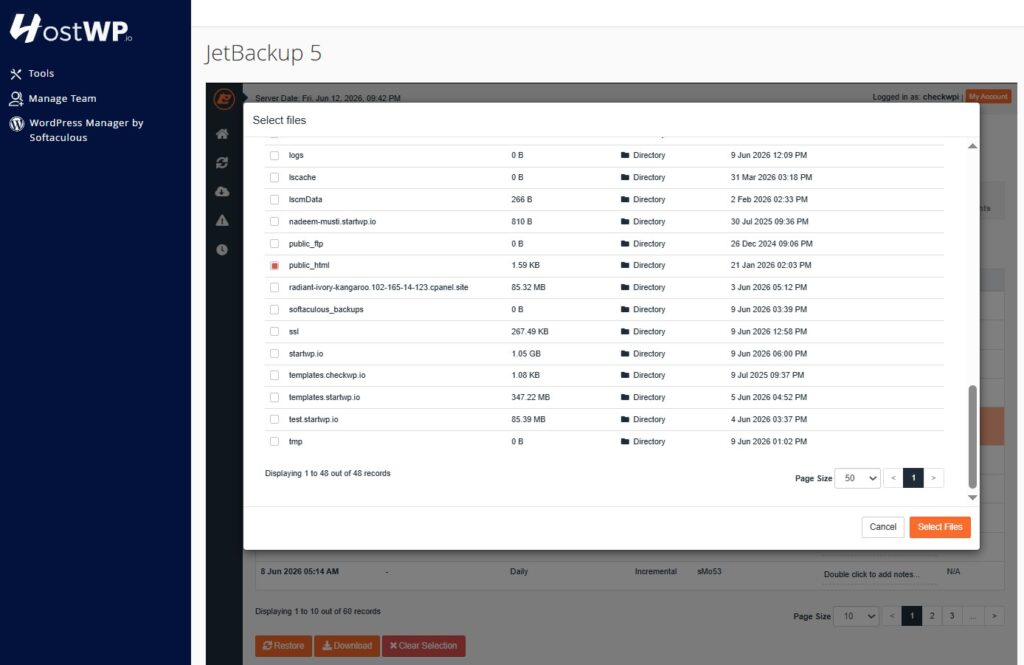
- (Optional) To restore a specific folder and/or file: Uncheck the “Checkbox” on the website’s folder, then navigate inside and select only the folder(s) and/or file(s) that need to be restored (e.g., wp-content/themes/your-theme).
- Click Select files, then click the Restore button.
Option 1B: Restoring the WordPress Database
You can also restore the database to bring back your posts, settings, and pages:
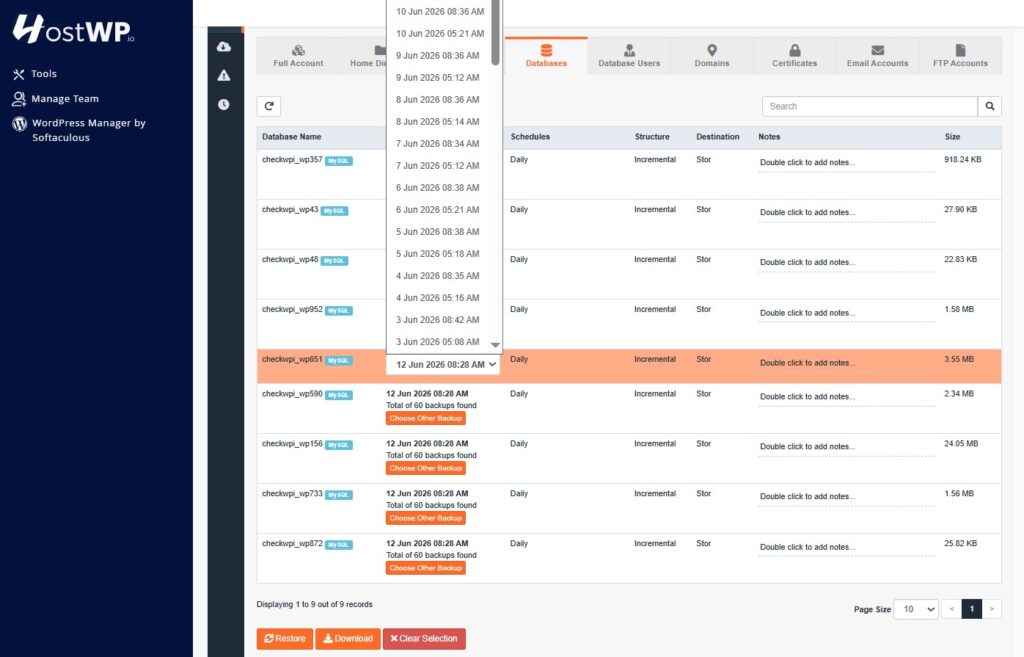
- From the JetBackup Dashboard, click on Databases.
- Find your specific WordPress database from the list.
- Tip: If you run multiple websites, look inside your site’s wp-config.php file to verify the exact database name.
- Select the same backup date you chose for your files.
- Click Restore.
Option 2: Restoring Your Emails
If you accidentally deleted critical emails or lost custom IMAP folder structures, JetBackup isolates your mail configurations perfectly without touching your actual website files or database.
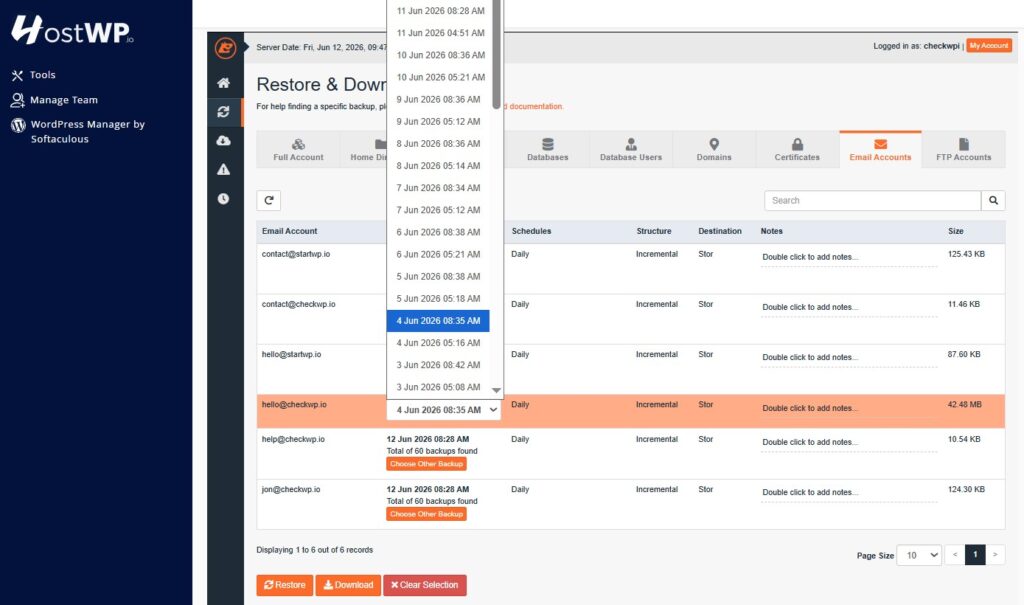
- On the JetBackup dashboard, click on Email Accounts.
- You will see a list of individual email accounts hosted on your domain.
- Select the specific email account (e.g., [email protected]) you want to recover.
- Choose the backup date right before the emails were lost.
- Click Restore.
Tracking Your Restore Progress
JetBackup processes all extraction and restoration tasks in the background, so your browser window doesn’t freeze.
- To check the status, click on the Queue icon in the left-hand JetBackup sidebar.
- Your task will show as Pending or Processing.
- Once the status changes to Completed, your selected files, database, or emails are officially live!
JetBackup Best Practices
- Always check the Queue: Never trigger a second restore task while a task is still processing in the queue, as this can lock database tables and cause script timeouts.
- Restore Matching Dates: Always restore your Files and your Database from the exact same day and timestamp. Mixing an older database with newer files can break your WordPress core.
- Selective Restores Save Time: If you only messed up a stylesheet, do not restore the full backup. Restoring a single 50KB file takes 2 seconds, whereas restoring a 10GB full backup can take several minutes.
Frequently Asked Questions
How long does a restore take to complete?
The completion time depends entirely on the size of your website files or database tables. A small database or a single file can be restored in under 30 seconds, while a massive website with tens of gigabytes of images and media may take several minutes. You can close your browser tab safely after starting a restore; the process runs entirely in the background on our servers.
Can I restore my files to a previous date and keep my current database?
Yes, but you should proceed with caution. If you are just fixing a corrupted theme or plugin file, restoring only your files is perfectly safe. However, if your plugins require specific database structures that were changed recently, mixing an old file backup with a brand-new database can cause critical site errors.
Where are HostWP.io backups stored? Are they safe?
To ensure ultimate security and redundancy, all snapshots (backups) are fully encrypted and transmitted to an isolated, off-site cloud storage server. This means that even in an absolute worst-case datacenter event, your data remains completely decoupled, safe, and ready to deploy.
Does restoring a backup overwrite my current live website data?
Yes. When you initiate a restore via JetBackup 5, it will safely overwrite the existing files or database tables currently on your live account with the data from your chosen backup point. If you have made changes today that you do not want to lose, ensure you export them manually before running a rollback.
Can I download a backup copy to my local computer instead of restoring it live?
Absolutely! Instead of clicking the Restore button on your selected backup date, you can click the Download button. JetBackup will compile your requested data into a compressed archive (.tar.gz or .zip). Once processing is complete on your Queue dashboard, a green download link will appear, allowing you to save it locally.
I see multiple databases in my list. How do I know which one belongs to my WordPress site?
If you host multiple websites under one cPanel account, the easiest way to check is via your files. Open the cPanel File Manager, navigate to that specific website’s root folder, and open the wp-config.php file. Look for the line that says: define( 'DB_NAME', 'your_database_name' );. Match that name inside JetBackup to ensure you are rolling back the correct site.