





Your WordPress website is your business. If a plugin update breaks your site, or a hacker gets in, you could lose everything. The only way to fix a broken site quickly is to have a recent backup and restore it.
While your hosting provider might offer backups, it is always smart to keep a copy somewhere else. Our teams at HostWP.io recommend using Google Drive or Dropbox to take automated backups of WordPress sites. Google Drive is perfect for this. It is free, secure, and keeps your data off your main server.
Note: HostWP.io offers automated incremental backups of all WordPress websites taken every 24 hours and are retained for 30 days. Customers can restore backups of web files, databases, emails, and download backups anytime they want. Read more about JetBackups at HostWP.io here.
Even if you use a reliable, fast host like HostWP.io, having your own automated backup to Google Drive gives you total peace of mind, as you will have another copy of your files.
Here is exactly how to set it up in less than five minutes.
What You Need Before You Start
- A working WordPress website.
- A free Google (Gmail) account.
- The free version of the UpdraftPlus or Backuply Pro plugin. It is the most popular backup tool for WordPress and integrates easily with Google Drive.
Note: All HostWP.io customers get Backuply Pro for free on unlimited WordPress websites.
Method # 1: Using Backuply Pro to Set Up Google Drive Backups
Here is how to set it up in just a few clicks:
Step 1: Install and Activate Backuply
- Log in to your CPanel dashboard.
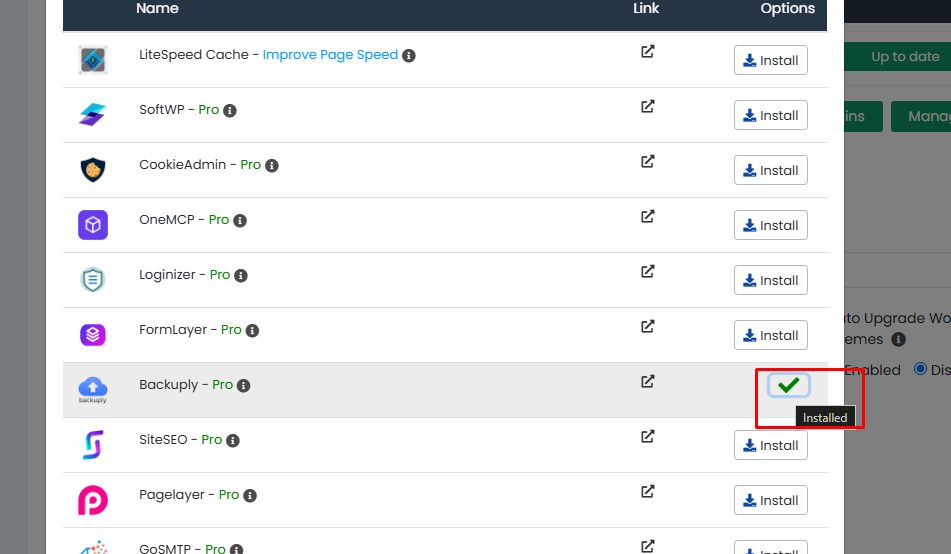
- Go to Manage Plugins > look for Backuply.
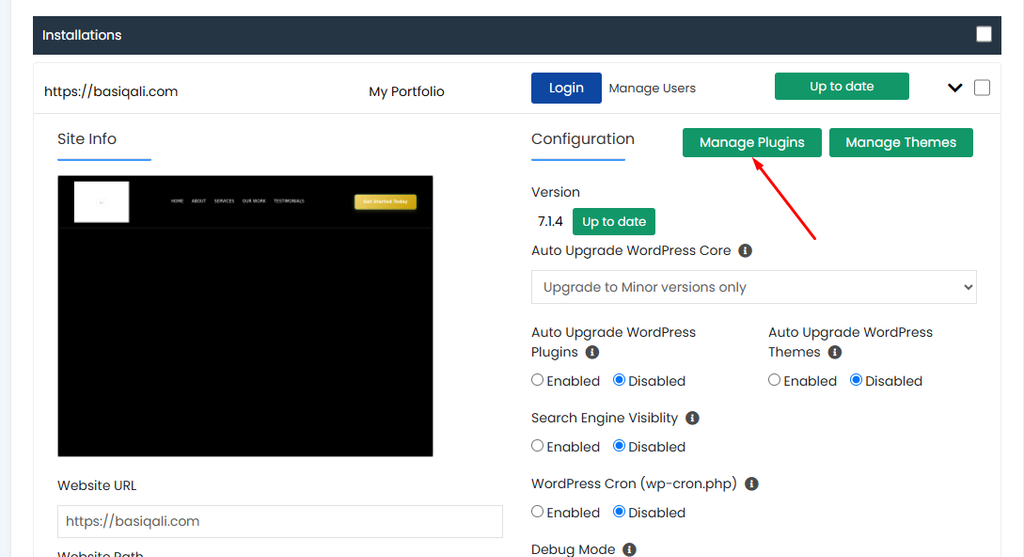
- Click the Install button.
- Once installed, click Activate.
Step 2: Connect Your Google Drive
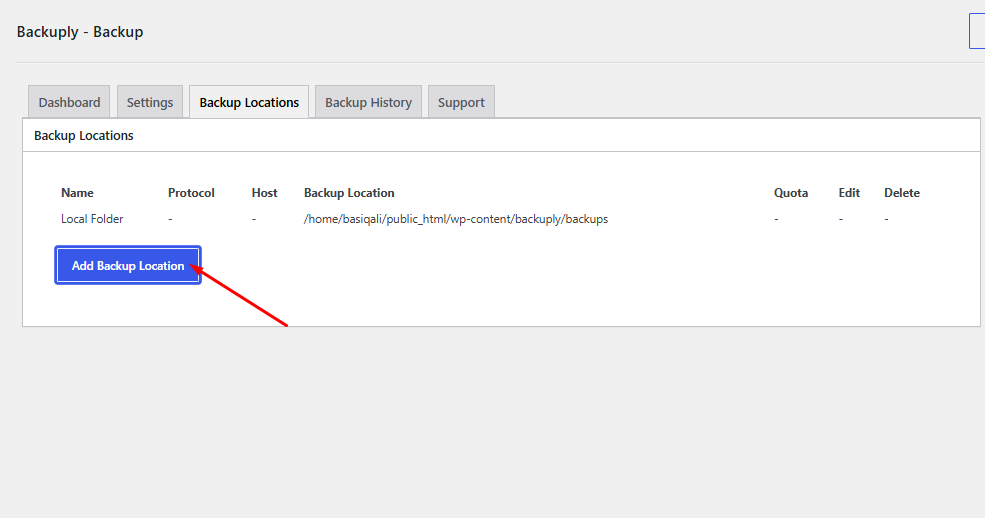
- In your left-hand WordPress menu, click on Backuply.
- Go to the Settings tab at the top.
- Go to Backuply locations and add a Backuply location
- Go to Dashboard, check backup directories and backup the database, and click Create backup.
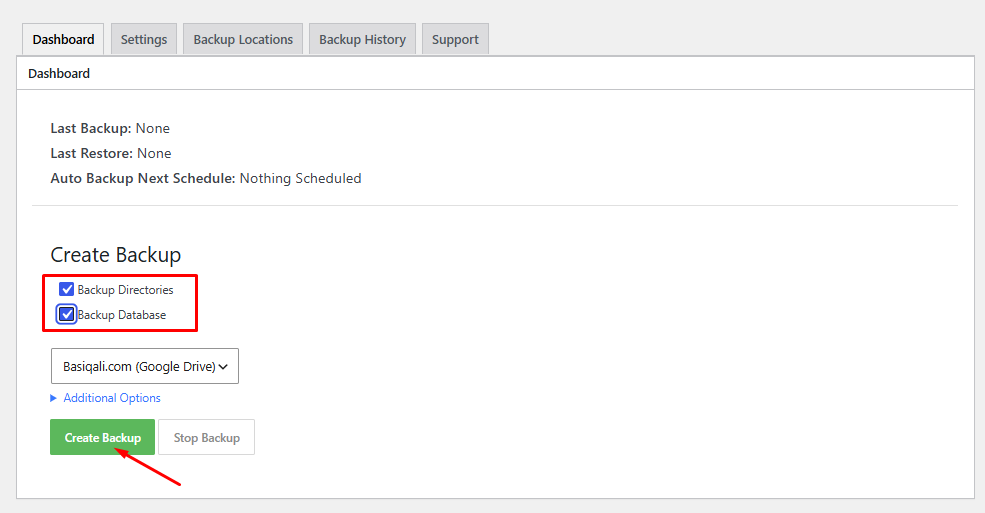
- A progress bar will appear. Wait a few moments while Backuply securely sends your site to Google Drive.
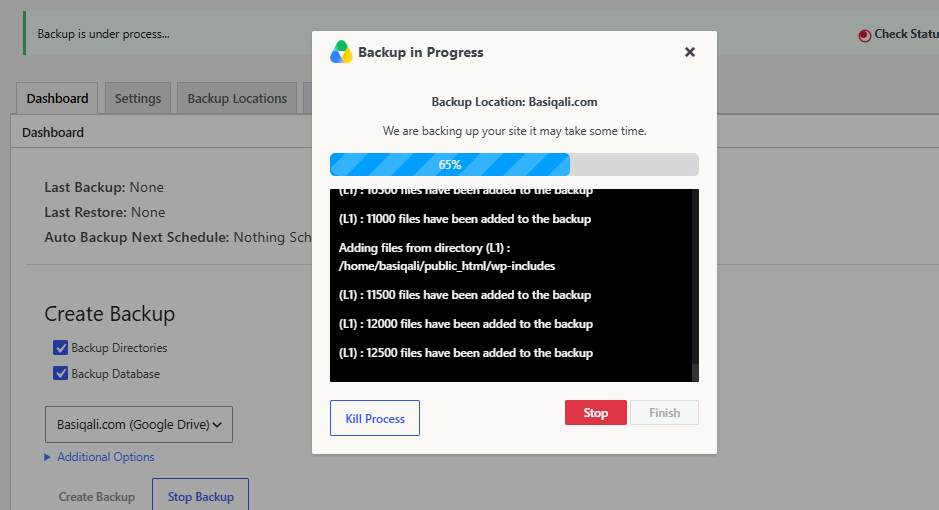
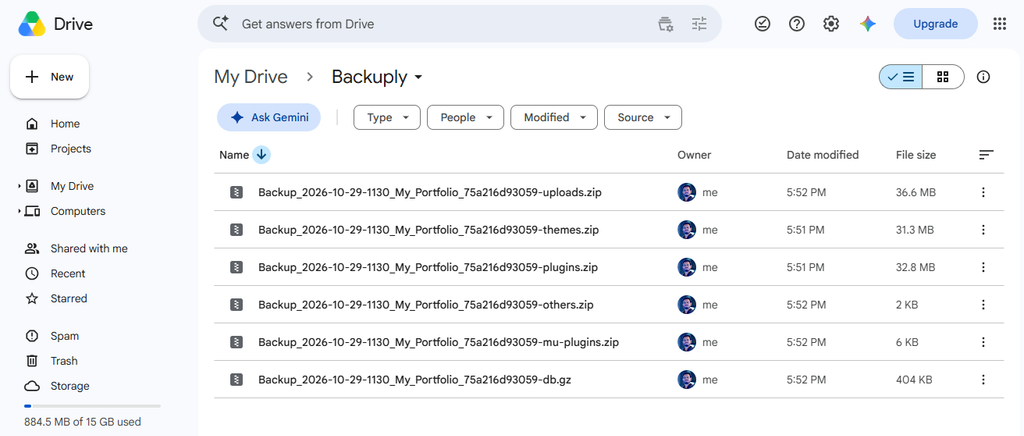
- Once it says “Completed,” your site is safely stored in the drive.
Method # 2: Using UpdraftPlus To Set Up Automated Google Drive Backups
Step 1: Install UpdraftPlus Plugin
First, we need to install the tool that will do the heavy lifting.
- Log in to your WordPress admin dashboard.
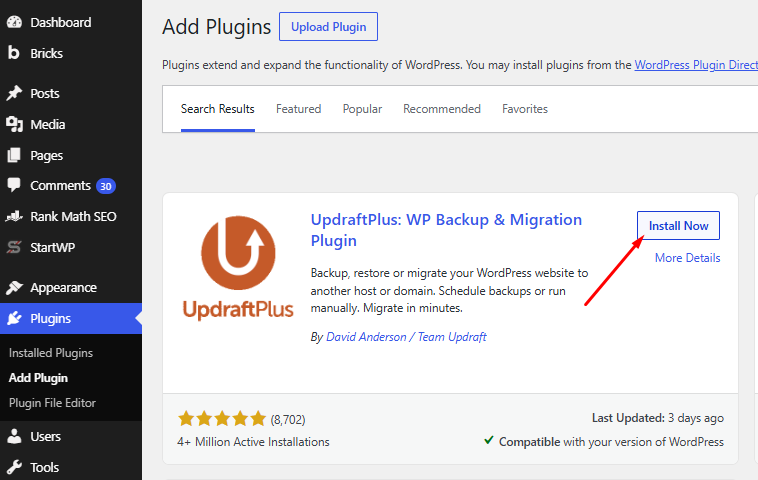
- Go to Plugins > Add New Plugin.
- In the search bar, type UpdraftPlus.
- Find “UpdraftPlus – Backup/Restore” and click Install Now.
- Once it installs, click Activate.
Step 2: Select Google Drive as Your Storage
Now we need to tell the plugin where to send your backup files.
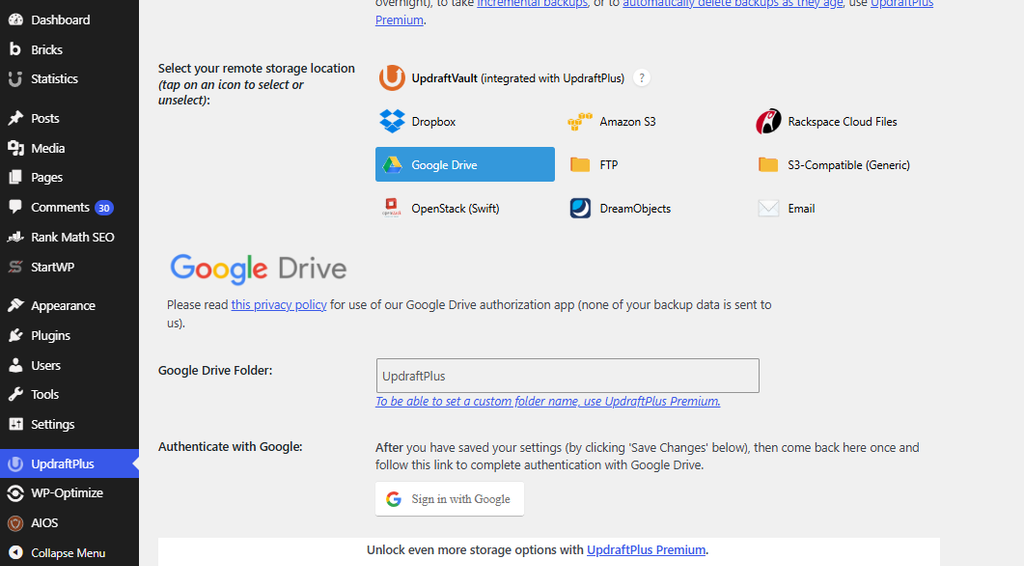
- Go to Settings > UpdraftPlus Backups in your left-hand menu.
- Look for the section called Remote Storage.
- Click the Google Drive icon. It will turn blue to show it is selected.
Step 3: Connect Your Google Account
This is the most important step. You have to give the plugin permission to access your Google Drive.
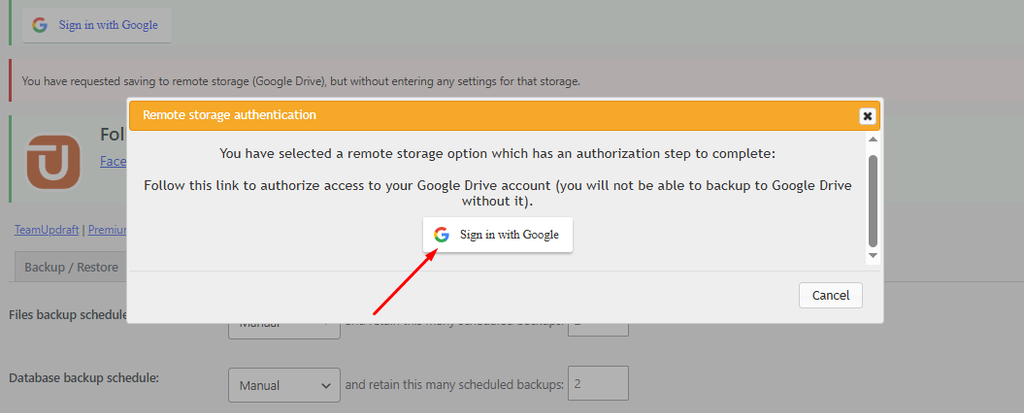
- Scroll down to the bottom of the page and click the orange Save Changes button.
- A pop-up box will appear. It will say you need to authorize access to Google Drive.
- Click the link inside that pop-up box. It will open a new window asking you to log in to your Google account.
- Log in, and click Allow to give UpdraftPlus permission to create a folder in your Drive.
- Go back to your WordPress tab and click Complete Setup.
Step 4: Set Your Backup Schedule
You do not want to back up your site every single hour. It will fill up your Google Drive and slow down your server. You need a smart schedule.
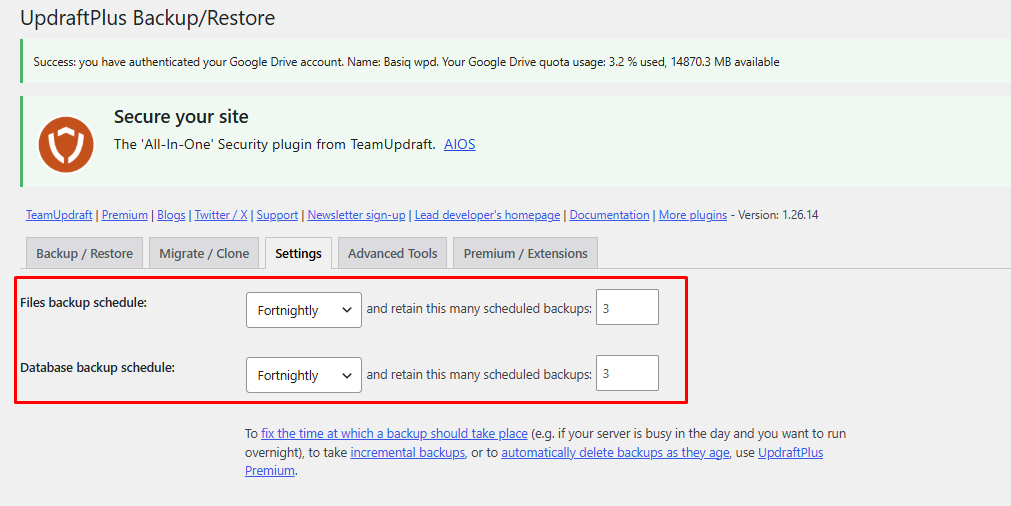
Look at the Files backup schedule and Database backup schedule settings:
- Files (Themes, plugins, images): Set this to Weekly or Fortnightly. Your design and plugins do not change every day.
- Database (Posts, pages, comments, users): Set this to Daily or Every 12 hours. This is where your actual content lives, so it needs to be backed up more often.
- Retention: Set this to 2 or 3. This tells the plugin to only keep the last 2 or 3 backups. It will automatically delete the oldest ones, so your Google Drive does not get full.
Step 5: Save and Run Your First Backup
Your schedule is set, but you want to make sure it actually works right now.
- Scroll down and click Save Changes one more time.
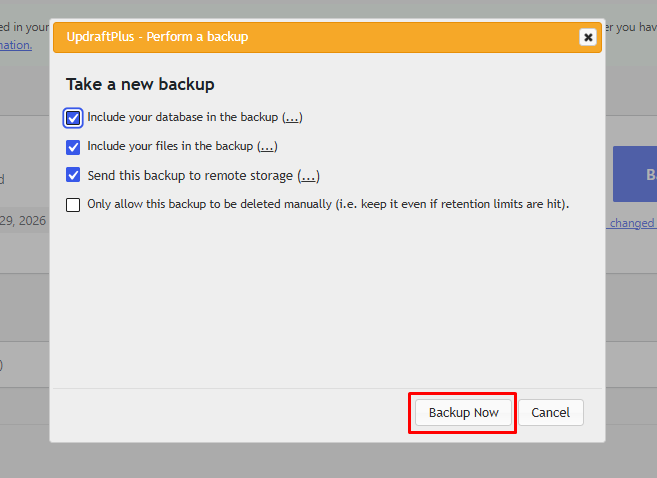
- At the top of the page, click the big blue Backup Now button.
- A box will pop up. Make sure both Include your database and Include your files are checked.
- Click Backup Now again.
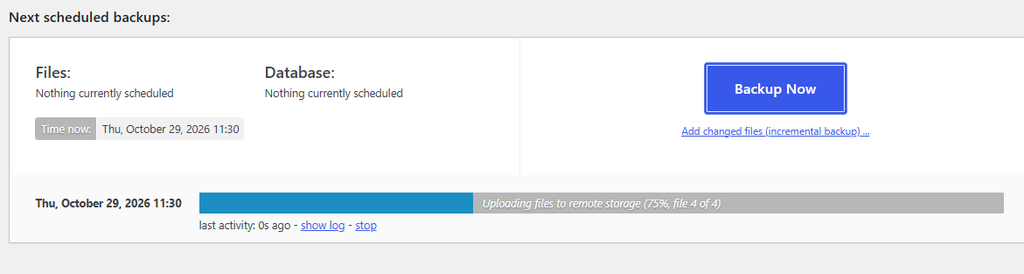
The plugin will now zip up your website and send it to Google Drive. This might take a few minutes depending on your site size. When it finishes, you will see your backup files listed on the screen.
You will see the processing bar for doing the backup now:
How to Check Your Backup in Google Drive
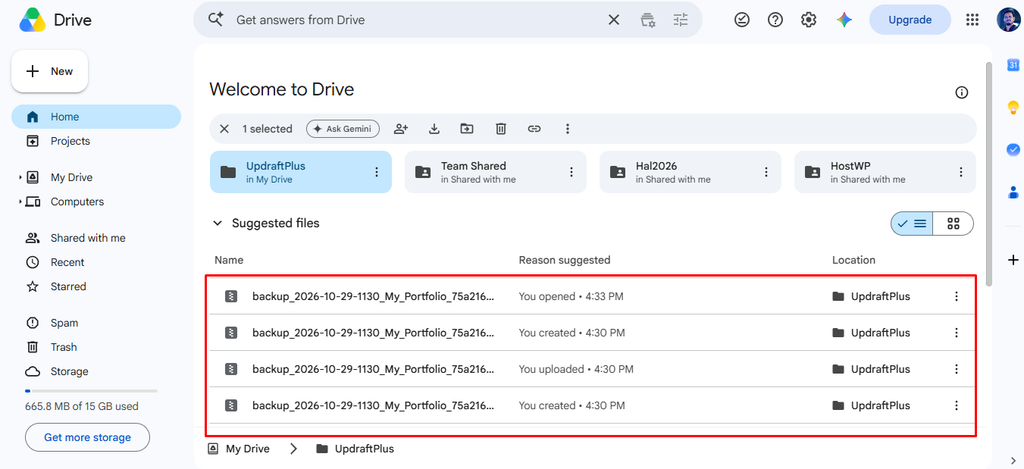
To make sure it actually worked, open a new tab and go to your Google Drive.
Look for a folder named UpdraftPlus. Inside that folder, you will see another folder named after your website. Inside that folder, you will see your zip files. Your site is now safely stored in the cloud.
Author’s Take
Setting up the backup is only half the job. The other half is knowing how to use it.
I see website owners panic when their site crashes. They remember they have a backup, but they have never actually tested the restore process. Do not be that person. Once a month, take a backup of your Google Drive and restore it to a staging site. Make sure it works. A backup you cannot restore is just a useless zip file.
Also, keep your retention number low. Keeping 50 backups of your site in Google Drive will hit your 15GB free limit very fast. Keeping just the last 2 or 3 backups is plenty to keep you safe without paying for extra cloud storage.
At HostWP.io, we already run automated, daily backups on our high-speed servers to keep your site safe. However, the golden rule of data security is to always have an ‘off-site’ copy. That is why setting up this Google Drive backup is still a smart move. It gives you a personal copy of your data that is completely in your control, separate from your hosting account.
Final Words
Automating your backups to Google Drive takes five minutes and costs absolutely nothing. It protects your hard work from hackers, bad updates, and server crashes. Follow these steps today, and you will never have to worry about losing your website data again.