




A static website built with HTML and CSS gives you complete control over markup, layout, and appearance. However, every content update on an HTML website depends on someone who can edit code. For business owners and marketing teams, that dependency is usually the real cost of running a static site.
Bricks Builder addresses this problem with its HTML & CSS to Bricks feature.
Introduced in Bricks 2.3, the feature reads pasted markup and styles from your clipboard and converts them into native Bricks elements, global classes, and global variables.
Claude adds a second layer to this workflow. It can prepare HTML & CSS template code before you paste it, removing document wrappers, consolidating stylesheets, and organising CSS variables so the converter has clean input to work with. Since Bricks 2.4, Claude can also connect to a WordPress site through MCP and create Bricks templates and pages using the same permissions that apply inside the builder.
This tutorial explains how to use Claude with Bricks Builder to convert an HTML website into an editable WordPress site, what the conversion handles automatically, and what still requires manual work.
What Does Converting an HTML Site to Bricks Builder Using Claude Mean?
A static website uses HTML to define content and structure, CSS to control appearance, and sometimes JavaScript for interactive features such as dropdown menus, tabs, and sliders.
Bricks Builder is a WordPress theme and visual website builder. Its converter recognises standard HTML tags and translates them into editable Bricks elements.
A <section> can become a Section element, a <div> can become a Div, and heading tags can become native Heading elements. CSS classes become Bricks global classes, and variables declared in :root become Bricks global variables.
Claude does not perform this conversion itself. Bricks does. Claude’s role depends on which workflow you choose:
- Preparation: Claude helps generate HTML & CSS files, cleans and restructures your HTML and CSS so the Bricks converter can process it reliably. You then paste the result into the builder yourself.
- Direct connection: On Bricks 2.4 and later, Claude connects to your site through MCP and calls Bricks abilities to convert and apply content, with your review at each stage.
This distinction matters. Bricks converts pasted code into native Bricks elements, not Gutenberg blocks. It doesn’t migrate your hosting, domain, or website functionality. You will still need to handle assets, scripts, forms, internal links, and redirects.
Claude also does not guarantee a pixel-perfect result. Your WordPress theme styles and any active plugin CSS load on the same page, so you’ll usually need to adjust spacing and typography after conversion.
What You Need Before Starting
Prepare the following items before you begin.
Existing website files. Keep your HTML files, CSS stylesheets, images, fonts, icons, and JavaScript files available in one folder.
A WordPress installation. Use a local development environment or a staging website so you can work without affecting your live site.
Bricks Builder 2.3 or later. Install and activate the Bricks theme with a valid license. Version 2.3 is the minimum for the paste converter. Version 2.4 or later is required for the direct Claude connection.
- WordPress 6.9 or later, if you plan to use MCP. The Bricks AI abilities rely on the WordPress Abilities API. The toggle stays disabled when that API is unavailable.
- A Claude account. Any plan works for the preparation workflow. The direct connection requires an MCP-compatible client such as Claude Code.
- Website backup. Save a copy of your original files and back up the WordPress installation before making major changes.
- Permission to create global classes. Without this permission, Bricks creates the elements but cannot create the class records your CSS depends on.
- A secure builder connection. Bricks reads pasted code through the browser’s Clipboard API. Use HTTPS or a trusted local development address, and allow clipboard access when your browser prompts you.
If you are converting a large website, identify the shared sections first. The header, footer, navigation, and repeated content blocks appear across several pages and are better handled as templates than pasted repeatedly.
Claude-Assisted Conversion vs. Other Methods
Several ways exist to bring an existing static design into WordPress. The right choice depends on how much editing flexibility you need and how much you want to automate.
| Approach | How it works | Best for | Main limitation |
| Claude preparation + Bricks paste | Claude cleans the markup and CSS, then you paste it into the builder for conversion | Single pages, first-time conversions, retaining an existing design | Some CSS and functionality need manual refinement |
| Claude connected through MCP | Claude calls Bricks abilities to convert and apply content on the site | Multi-page projects and repeated agency workflows | Requires Bricks 2.4+, WordPress 6.9+, and careful permission setup |
| Manual Bricks rebuilding | You recreate the layout using the builder’s elements and controls | Projects that need a redesign or structural changes | Requires the most manual work |
| WordPress Custom HTML block | Stores HTML markup inside a WordPress block | Embedding code or preserving one small custom section | Does not provide native Bricks editing controls |
For most projects that need to keep their existing appearance while moving to WordPress, the first approach is a practical starting point. The MCP workflow becomes worthwhile when you convert several pages with a shared design system.
Step 1: Confirm Your Bricks and WordPress Versions
Before preparing any code, confirm which workflow your installation supports.
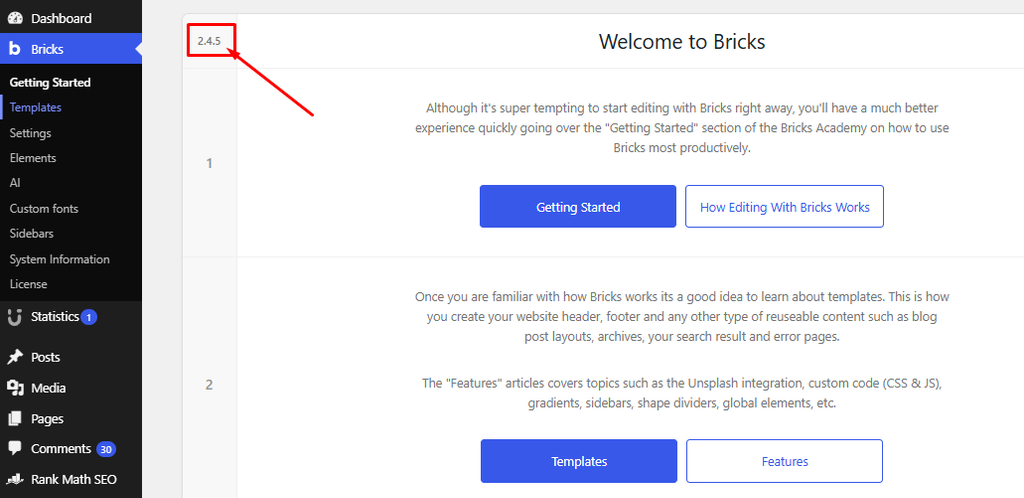
In your WordPress dashboard, open Bricks → Dashboard and note the version number. If it shows 2.3 or later, the paste converter is available. If it shows 2.4 or later, the AI abilities are also available.
Next, check your WordPress version under Dashboard → Updates. The MCP workflow needs WordPress 6.9 or later. The paste workflow has no specific WordPress version requirement.
Update Bricks and WordPress before you start, not midway through a conversion.
Step 2: Prepare Your HTML and CSS With Claude
This is where Claude does the most useful work in the paste workflow.
Template HTML usually contains material the converter does not need: the <head>, meta tags, stylesheet links, analytics snippets, and script tags. Pasting it all produces a cluttered structure with unnecessary Code elements.
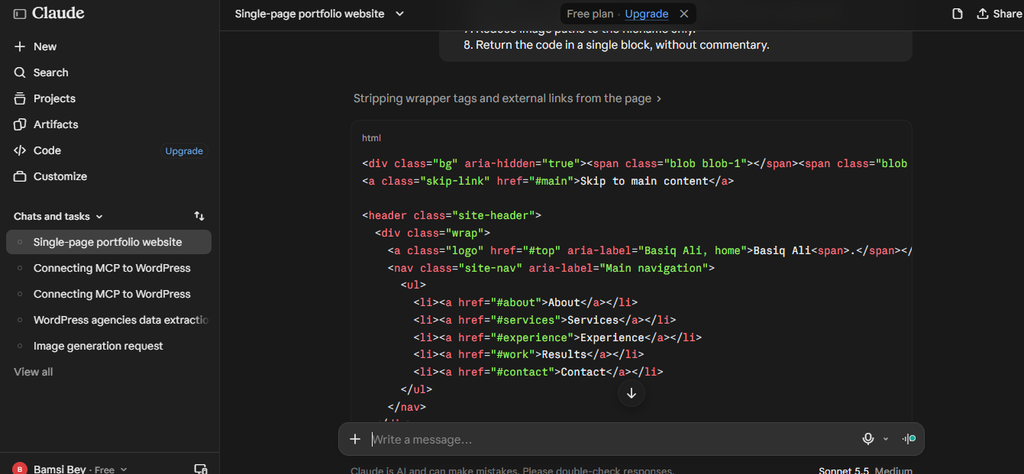
Open Claude, attach your HTML and CSS files, and give it clear instructions. A prompt along these lines works well:
I am converting this HTML template into WordPress Bricks Builder.
Prepare the code with these rules:
1. Remove the <html>, <head>, and <body> wrapper tags. Keep the page content only.
2. Remove all <script> tags and external stylesheet <link> tags.
3. Keep semantic tags: section, div, h1-h6, p, img, a, ul, li.
4. Keep every class name exactly as written. Do not rename classes.
5. Place all CSS in one <style> block below the HTML.
6. Move CSS variables into a :root block at the top of that <style> block.
7. Reduce image paths to the filename only.
8. Return the code in a single block, without commentary.
Review the output before copying it. Confirm that your class names survived unchanged and that the CSS is complete.
Keeping the HTML and CSS together matters. Bricks needs the markup to create elements and the stylesheet to create classes and variables. Pasting them separately means pasting twice, and the class records may not attach correctly.
A note on external font imports. An @import rule split across multiple lines can leave an incomplete fragment in the stylesheet and trigger a CSS parsing error during conversion. For your first attempt, remove external font imports and use a standard font fallback. You can set the correct typography in Bricks after the layout converts.
Save a copy of the original source before making changes.
Step 3: Enable HTML & CSS in Bricks
Bricks must be configured to recognize code on your clipboard before pasting will do anything.
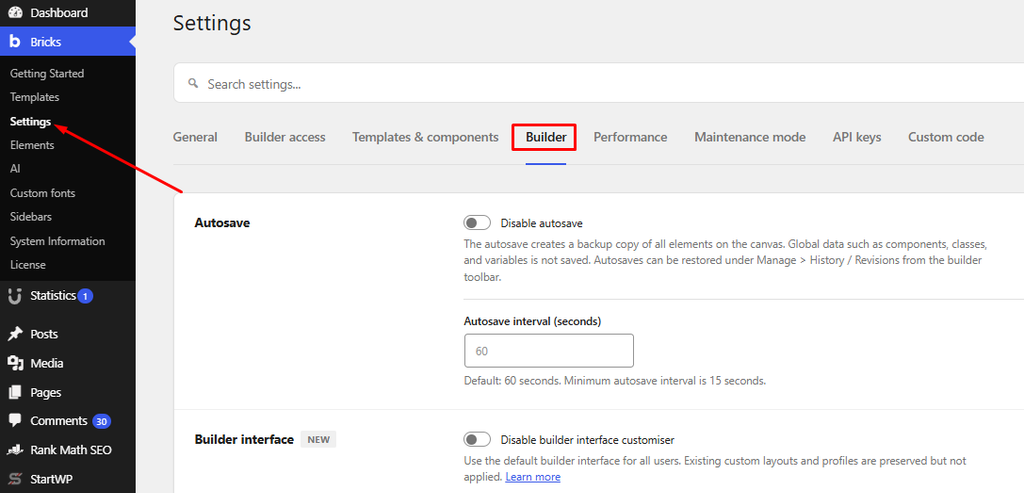
1. Open Bricks Settings. In the WordPress admin menu, locate Bricks and select Settings.
2. Open the Builder tab. This section contains the options that control the visual editing interface.
3. Locate HTML & CSS in Bricks. Scroll through the Builder settings until you find this option.
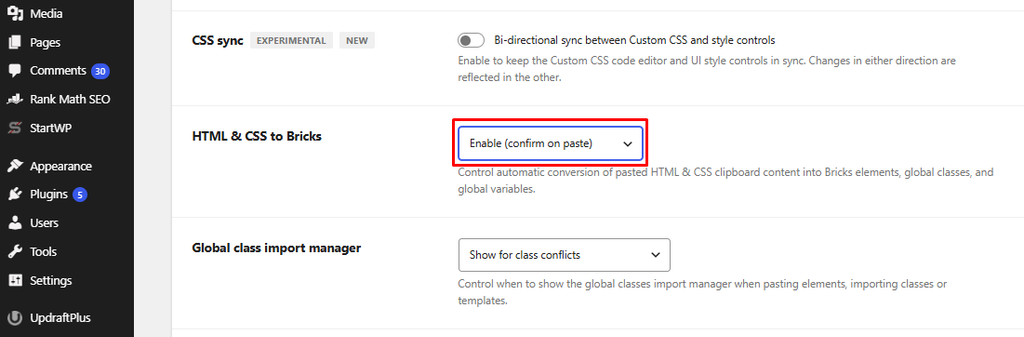
4. Select Enabled (confirm on paste). The setting offers three choices: enabled with confirmation, enabled without confirmation, and disabled. Confirmation is a suitable choice for a first conversion because you can review the action before Bricks processes the clipboard content.
Save your settings after changing the option.
Step 4: Create a New WordPress Page
You need a page where Bricks can place the converted layout.
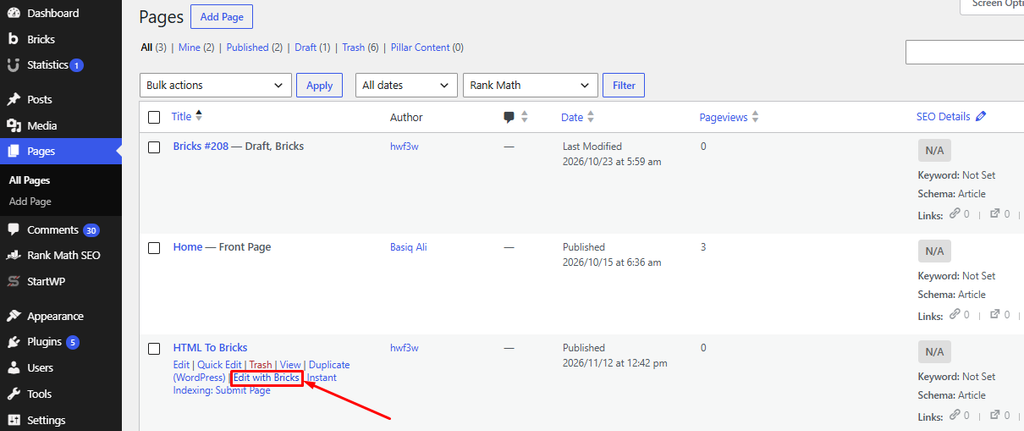
From your WordPress dashboard, go to Pages → Add New Page. Give it a clear name, save it as a draft, and open it with Edit with Bricks.
Using a draft page protects your published content. If the conversion produces an unexpected structure, you can clear the page and try again without affecting anything live.
For a multi-page website, start with the homepage. Once you understand how your specific markup converts, the remaining pages go faster.
WordPress page edit with Bricks.
Step 6: Paste Into Bricks and Review the Structure
Click the main canvas in the Bricks builder, then press Ctrl + V on Windows or Cmd + V on macOS. Approve the conversion when Bricks asks for confirmation.
Your browser may request clipboard permission the first time. Allow it, then reload the builder if pasting appears to have no effect.
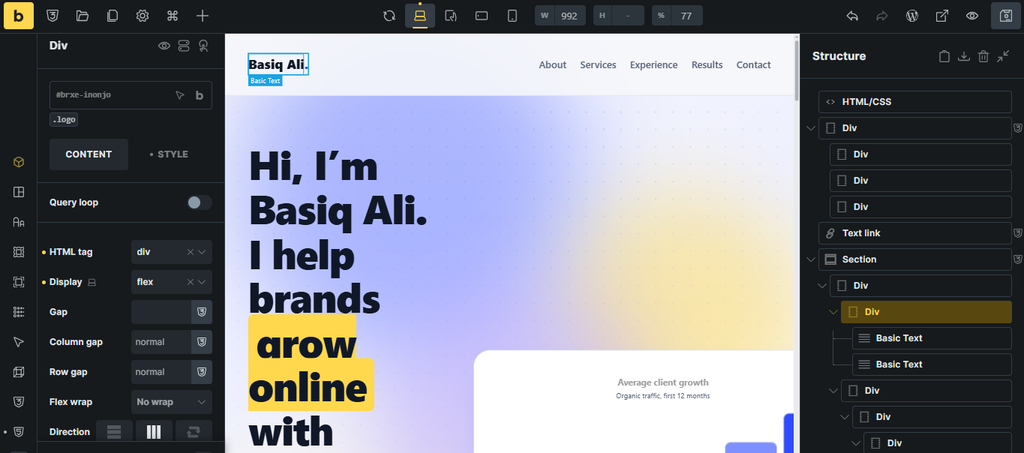
After conversion, open the Structure panel and confirm that you have a real element tree rather than a single HTML block. Check that the header, hero section, content sections, and footer all appear.
Select a heading and confirm you can edit its text directly in the control panel. Then open the Global Classes manager and the Global Variables manager to verify that your CSS classes and :root variables were created.
If the elements appeared but the classes did not, your user account is missing the permission to create global classes.
Step 7: Check the Website on Desktop and Mobile
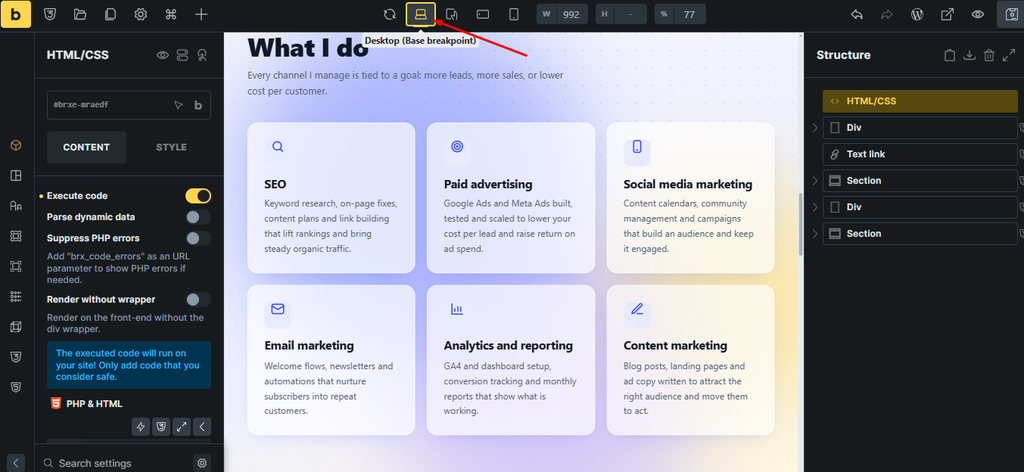
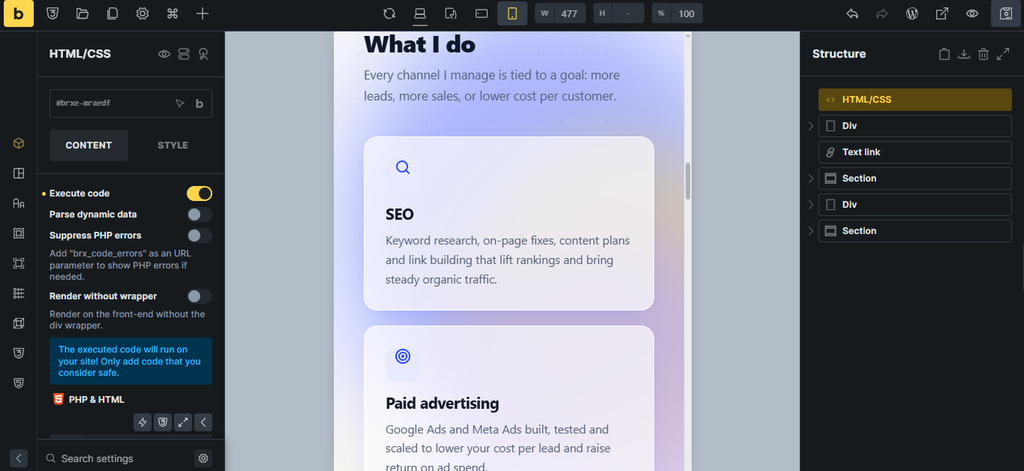
Use the responsive preview controls in the builder toolbar to check desktop, tablet, and mobile views.
Bricks converts simple @media (max-width: …) rules into native breakpoint controls when the width matches one of your configured breakpoints. Compound conditions, unmatched widths, and rules whose source order cannot be represented in Bricks breakpoint order stay in Custom CSS. This is intentional so styles aren’t applied at the wrong screen size.
Check the navigation, headings, buttons, and any card grids for overflow or misalignment. Adjust these manually, then preview the page on the frontend.
Step 8: Save, Preview, and Prepare for Publication
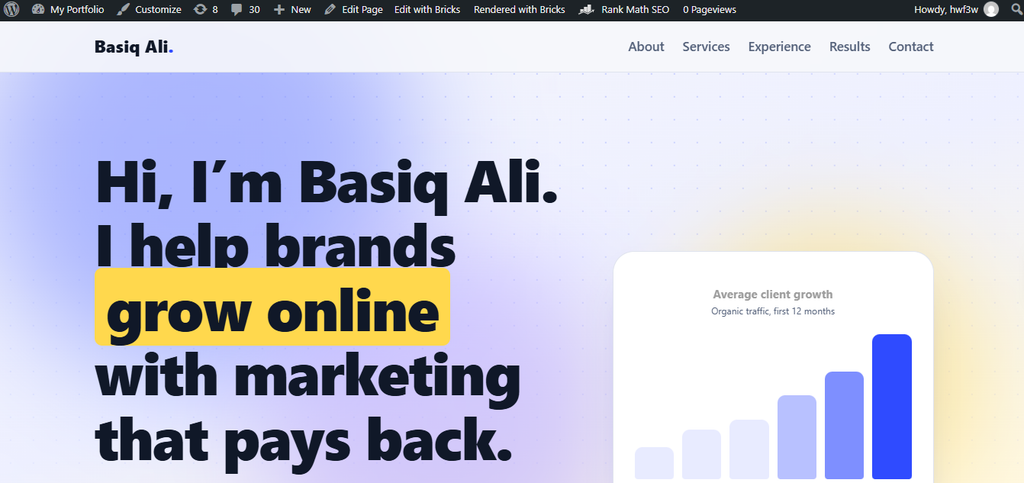
Save the page in Bricks and open it on the frontend.
Test navigation links, buttons, and section anchors. Replace placeholder business names, contact details, and sample links with your own information. Verify that every image loads and that no asset still points to an old path.
If this page replaces a live static website, review the old URL structure and configure redirects where necessary before switching over. Keep your heading hierarchy, title tags, meta descriptions, and image alt text consistent with the original to avoid losing search visibility.
Once these checks pass, the page is ready to publish.
Common Problems During Conversion
| Symptom | Likely cause | What to do |
| Pasting has no effect | Clipboard access is blocked, or the builder is not on a secure origin | Allow clipboard access, reload the builder, use HTTPS or a trusted local certificate |
| Elements appear without styles | The user cannot create global classes | Grant the permission, then paste again |
| Content lands in one HTML block | The code was pasted into a Code or HTML element | Paste onto the canvas or a Section instead |
| CSS parsing error | A broken or multi-line external @import rule | Remove the import and set typography in Bricks afterward |
| Images are missing | Original file paths were retained | Upload assets to the Media Library and reassign each image |
| Mobile layout is incorrect | A media query did not match a configured breakpoint | Adjust the value manually at the correct breakpoint |
| Slider or menu does not work | The script is inactive inside a Code element | Use a native Bricks element, or add the script through Custom code |
| Import rejected as too large | Input exceeds the 2 MiB conversion limit | Split the page into sections |
| Client cannot connect | Wrong endpoint, expired credential, or configuration not reloaded | Re-copy the configuration from Bricks → AI and start a new chat |
Bricks Builder Pricing and Who Should Use It
Bricks is a paid theme and visual builder with four plans
| Plan | Published price | Website allowance |
| Starter | $79 per year | 1 website |
| Business | $149 per year | 3 websites |
| Agency | $249 per year | Unlimited websites |
| Ultimate Lifetime | $599 one-time | Unlimited websites |
Annual plans include builder features, updates, and technical support for the subscription term. The Ultimate Lifetime plan includes future updates, features, and support with a single payment
Local and staging sites do not count against the license limit. Taxes may apply at checkout, and pricing can change, so confirm the current terms before purchasing.
For a single client project, Starter is sufficient. Agencies converting several static sites will find the Agency or Ultimate Lifetime plan more practical, particularly when using the MCP workflow across multiple installations.
Final Thoughts
Converting an HTML website into Bricks Builder works best when you treat it as a structured migration rather than a file upload. Claude prepares the code, Bricks converts it, and you review the result.
The HTML & CSS to Bricks feature gives you a native element tree with your classes and variables intact, which is a practical foundation for visual editing. It does not deliver a finished website. You still need to address assets, scripts, forms, responsive adjustments, and reusable templates.
Start with one page using the paste workflow. Once you understand how your markup converts and where your specific CSS needs refinement, the MCP connection becomes a reasonable next step for the remaining pages.
Whichever workflow you choose, work in staging, verify your global classes after each conversion, and keep backups of the original files. Those three habits prevent most of the problems listed above.