
You spent weeks planning the perfect event. The venue is booked, the guests are invited, and everything looks great. But then comes the hardest part: actually getting people to buy tickets.
If your checkout page is confusing, asks for too much information, or just feels clunky, people will simply close the tab and walk away. You do not want to lose attendees over a messy website.
Selling tickets online does not have to be complicated. The best way is to keep it incredibly simple. You just need a clean event page, clear ticket choices, secure payments, and instant digital tickets sent right to the buyer’s email.
In this guide, we will walk you through exactly how to sell event tickets online without the stress. We will also cover the must-have features of a good ticketing system and how tools like PaymentForm.io can handle all the heavy lifting for you.
Why Selling Event Tickets Online Matters
Organizing an event is already complex. You have to manage speakers, venues, schedules, marketing, and attendees. Ticket sales often become another challenge when you rely on separate tools.
A few years ago, selling event tickets often meant printing physical tickets, managing spreadsheets, collecting payments manually, and tracking attendees by hand.
That process becomes difficult as the number of attendees grows. Imagine organizing a workshop with 200 participants. You need to answer questions, confirm payments, send tickets, track different ticket categories, and verify attendees at the entrance. Without the right system, simple tasks quickly become time-consuming.
An online event ticketing system solves these problems by bringing everything into one workflow. Instead of managing different tools, organizers can create a single digital experience where attendees can:
- View event details
- Select a ticket type
- Complete payment
- Receive confirmation
- Access their ticket information
Modern ticketing platforms also focus on event pages, payment processing, attendee management, and reporting because these areas directly affect ticket sales and event operations.
Common Challenges Event Organizers Face When Selling Tickets
Before choosing a ticketing solution, it helps to understand where most problems happen.
1. Managing ticket sales manually
Many small organizations start with spreadsheets, social media messages, or payment screenshots. This may work for a small gathering, but it becomes difficult when:
- More people start purchasing tickets
- Multiple ticket types are available
- Organizers need attendee records
- Team members need access to sales information
Manual processes also increase the chance of missing payments or incorrect attendee details.
2. Creating a professional event experience
People do not only buy tickets. They buy confidence. Before purchasing, attendees usually want answers:
- What is the event about?
- When and where is it happening?
- Who is organizing it?
- What does the ticket include?
- How can they contact the organizer?
A simple payment button is often not enough. A complete event page helps visitors decide faster.
3. Handling payments and confirmations
After someone buys a ticket, the next steps should happen automatically. Attendees expect:
- Payment confirmation
- Ticket details
- Event information
- Organizer contact details
Sending everything manually creates unnecessary work for the event team.
4. Managing entry on event day
The event day is when preparation matters most. Long queues, manual guest lists, and searching through emails can create a poor attendee experience. Digital ticket management helps organizers verify attendees faster and keep the entrance process organized.
What Should You Look For in an Online Event Ticketing System?
Not every ticketing tool is designed the same way. Before choosing a solution, consider these important features.
- Custom ticket types: Sell regular, VIP, early bird, or different event packages with stock limits and discount codes.
- Multiple Payment Gateway Support: Allows attendees to complete purchases easily
- Attendee information fields: Collect important details during registration
- Digital ticket delivery: Makes ticket access faster and easier
- QR code support: Helps organize event check-in
Creating an Event Ticket Experience With PaymentForm.io
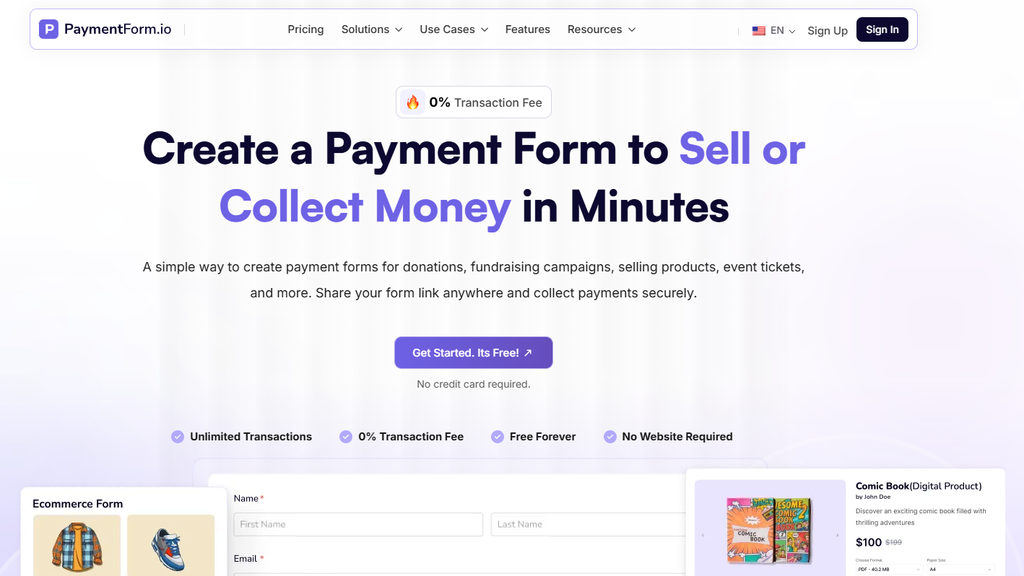
PaymentForm.io is a form-based checkout platform that lets organizations create payment forms, share them anywhere, and collect payments without a complex setup.
The platform runs on modules. It includes dedicated modules for donations, eCommerce (Physical & Digital), fundraising, memberships, contracts, and event tickets. Each module is designed for its specific use case, making it easier to create the right payment experience without starting from scratch.
For event organizers, the Event Ticket module provides a simple way to create and manage ticket sales.
You can create an event ticket form, customize the information you want to collect, connect payment gateways, and share your ticket form in multiple ways.
Instead of building a separate ticketing system, you can create the complete ticket purchase flow from one platform. Let’s go through the complete process.
Step 1: Create Your Event Ticket Form
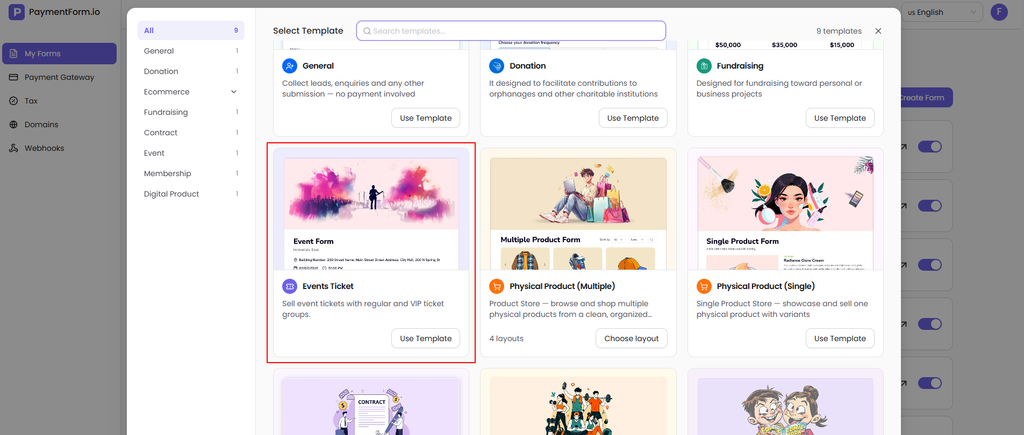
Log in to your account, click Create Form, and select the Event Ticket module.
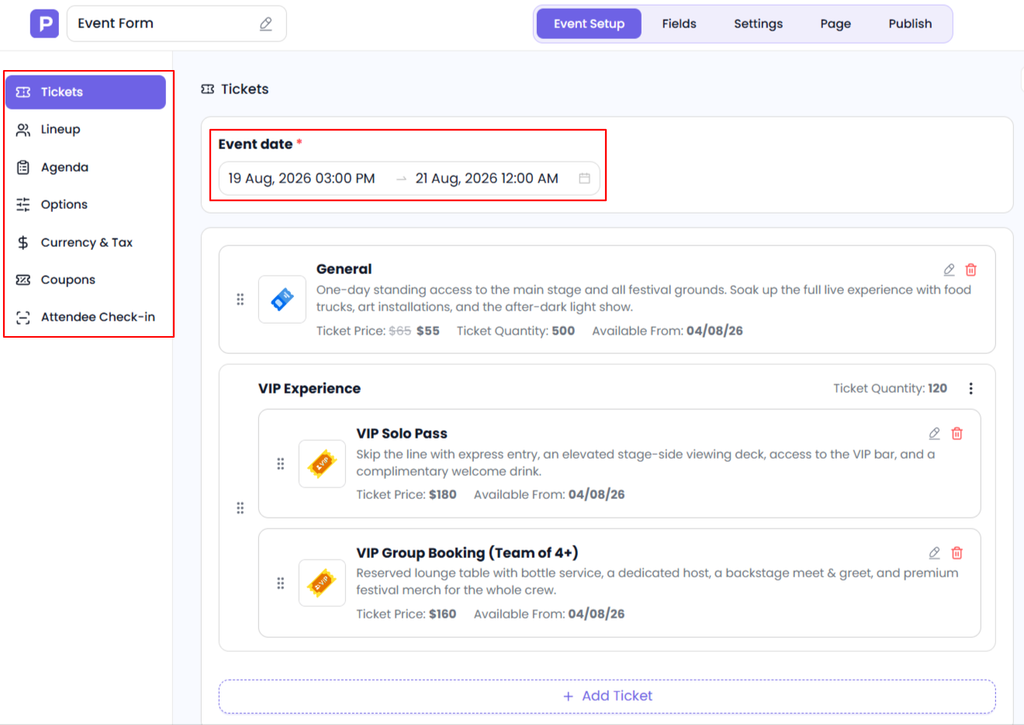
The builder opens on the Event Setup tab, with everything you need in the left sidebar. Tickets, Lineup, Agenda, Options, Currency and Tax, Coupons, and Attendee Check-in. Set the Event date range first & it is required.
Step 2: Create your ticket types
When you open the ticket setup screen, you will find a few sample tickets already created to help you understand the process. You can edit these tickets to match your event needs, or remove them and create new ones.
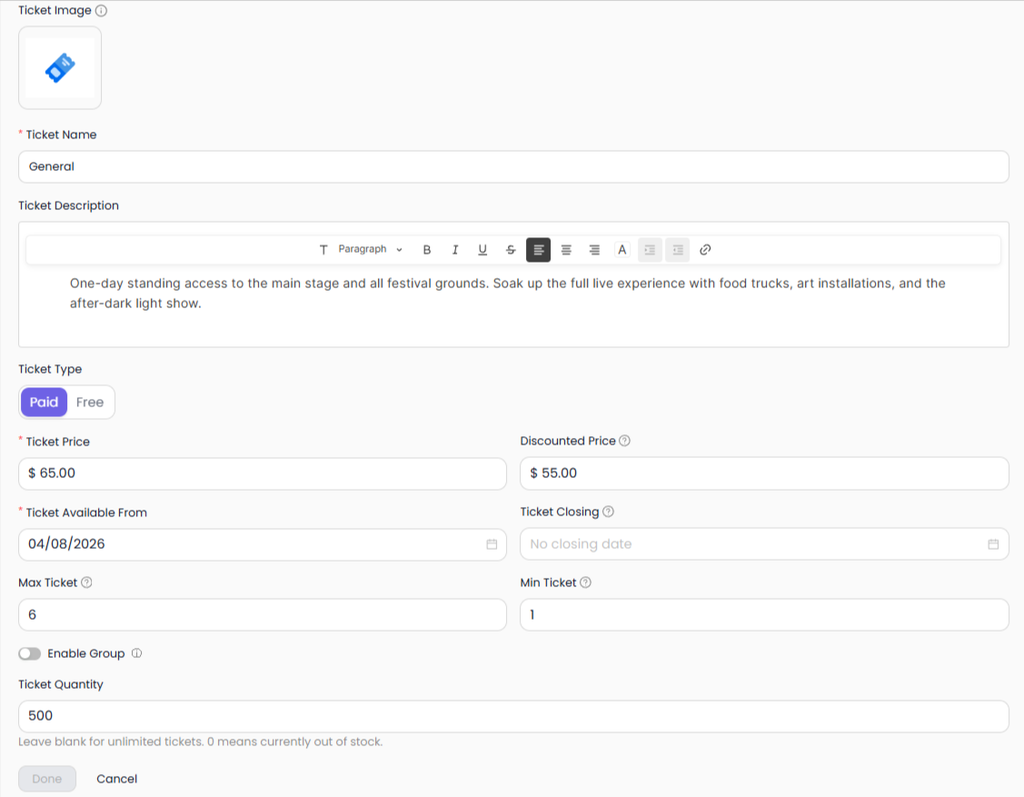
To create a ticket from scratch, click “+ Add Ticket” and start configuring your ticket details.
Here, you can define how your tickets will be sold:
- Ticket Type: Choose whether the ticket is Paid or Free. For paid tickets, you can set the regular price and add a discounted price if you want to offer an early bird or special offer. When you add a discount, buyers will be charged the discounted amount.
- Ticket Available From and Ticket Closing: Set the period when your tickets will be available for purchase. If you leave the closing date empty, ticket sales will continue until you stop them manually.
- Minimum and Maximum Ticket Quantity: Control how many tickets a customer can purchase in a single order. This helps limit individual purchases or allow group bookings.
- Ticket Quantity: Decide how many tickets are available for sale. Leave this field empty if you want unlimited ticket availability. Setting the quantity to 0 will mark the ticket as unavailable.
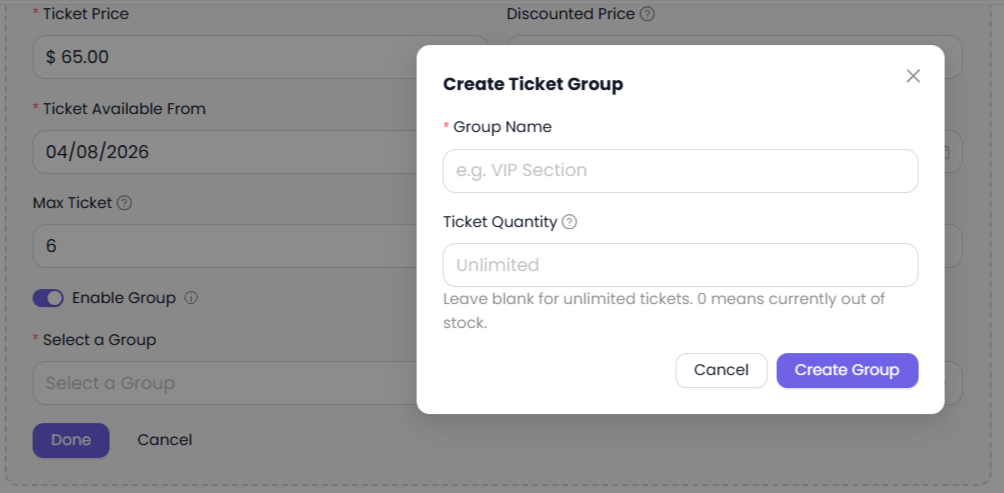
Group Ticket: If your event allows group bookings, you can create ticket groups for multiple attendees. Add a group name, set how many tickets the group includes, and let customers purchase multiple tickets together in one order. This is useful for company registrations, team events, family packages, or VIP bundles.
Step 3: Add your lineup and event agenda
Once your tickets are ready, the next step is adding the details that help people understand what they will experience at your event.
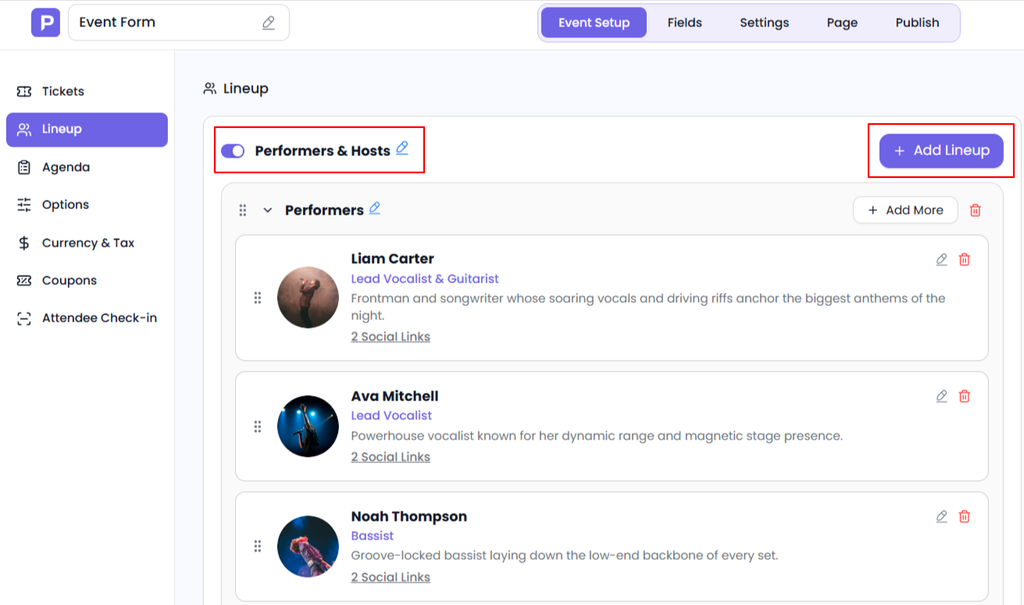
The Lineup section helps you showcase the people behind your event, such as speakers, performers, instructors, or guests. You can create different sections like Speakers, Performers, or Hosts, then add each person with their photo, name, role, short introduction, and social media links. You can also control the visibility of each lineup section with the Show on form toggle option.
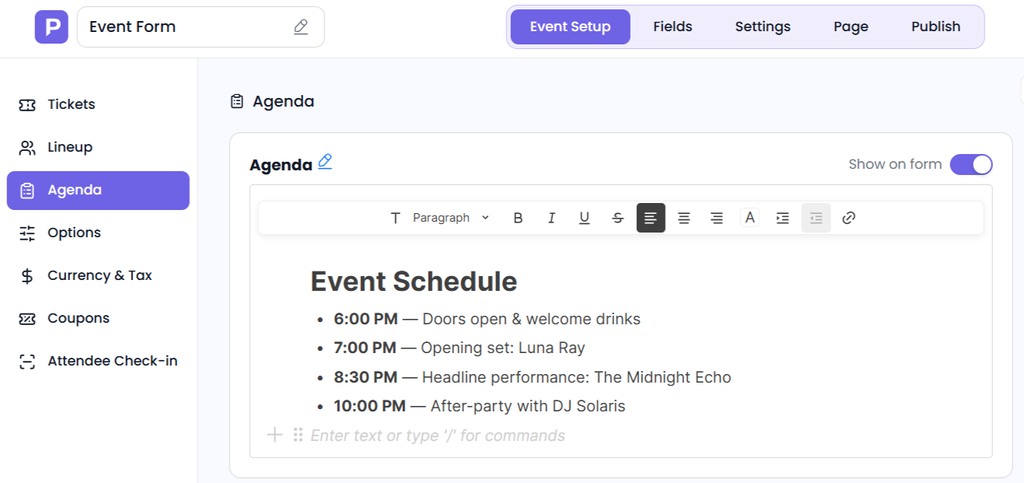
The Agenda section helps you create a clear event schedule using a built-in rich text editor. You can add headings, bullet points, links, and different formatting options to organize your timeline.
Step 4: Choose how tickets are delivered
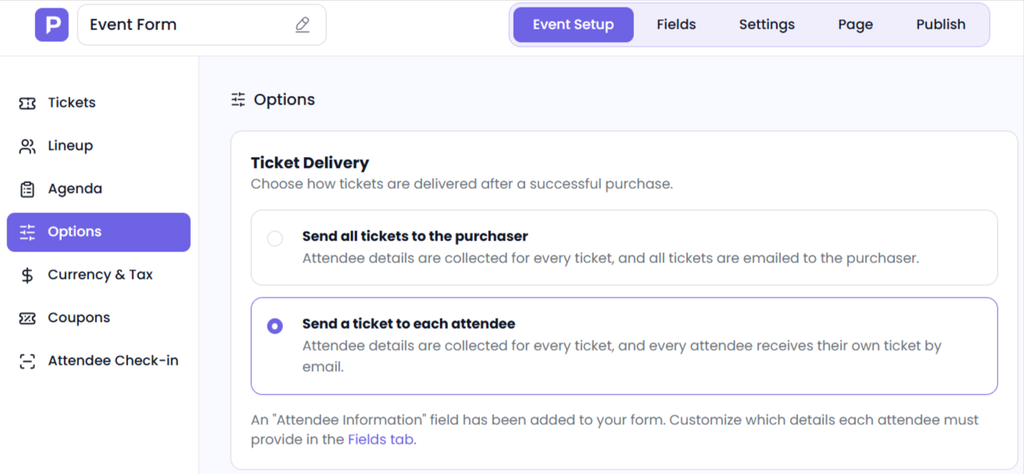
After setting up your tickets, decide how attendees should receive them after purchase. Open Options and pick one of two behaviours.
- Send all tickets to the purchaser: With this option, all tickets from one order are sent to the person who completed the purchase.
- Send a ticket to each attendee: This option sends an individual ticket to every attendee. It is useful for group registrations, company bookings, or events where each participant needs their own ticket confirmation.
Step 5: Set currency, tax, and coupons
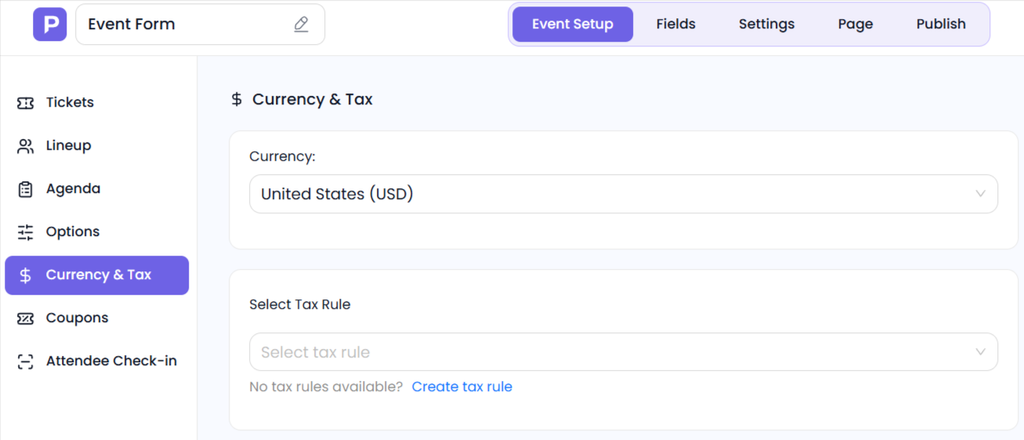
From Currency & Tax, choose the currency you want to use for your ticket sales. Make sure the selected currency is supported by your connected payment gateway. If you are selling paid tickets, you must connect at least one payment gateway before making your event live.
You can also apply tax rules to your ticket orders. If no tax rules are created yet, you will see a Create tax rule option.
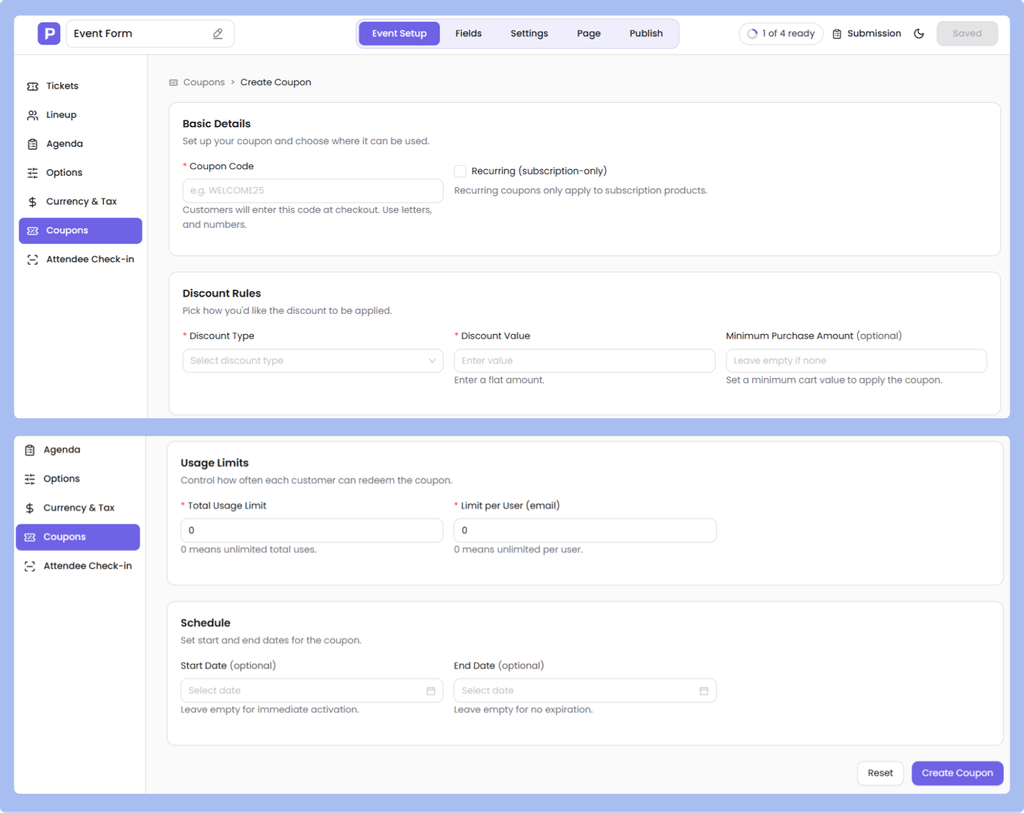
To offer discounts for your event, you can create coupons directly from the Coupons section.
Create a unique coupon code, choose whether the discount should be a fixed amount or a percentage, and set any conditions you need. You can also control coupon availability by setting:
- Total usage limit to decide how many times the coupon can be redeemed overall.
- Per-user limit to restrict how many times one attendee can use the same coupon.
- Start and end dates to automatically activate and expire the offer.
Step 6: Customize your attendee fields
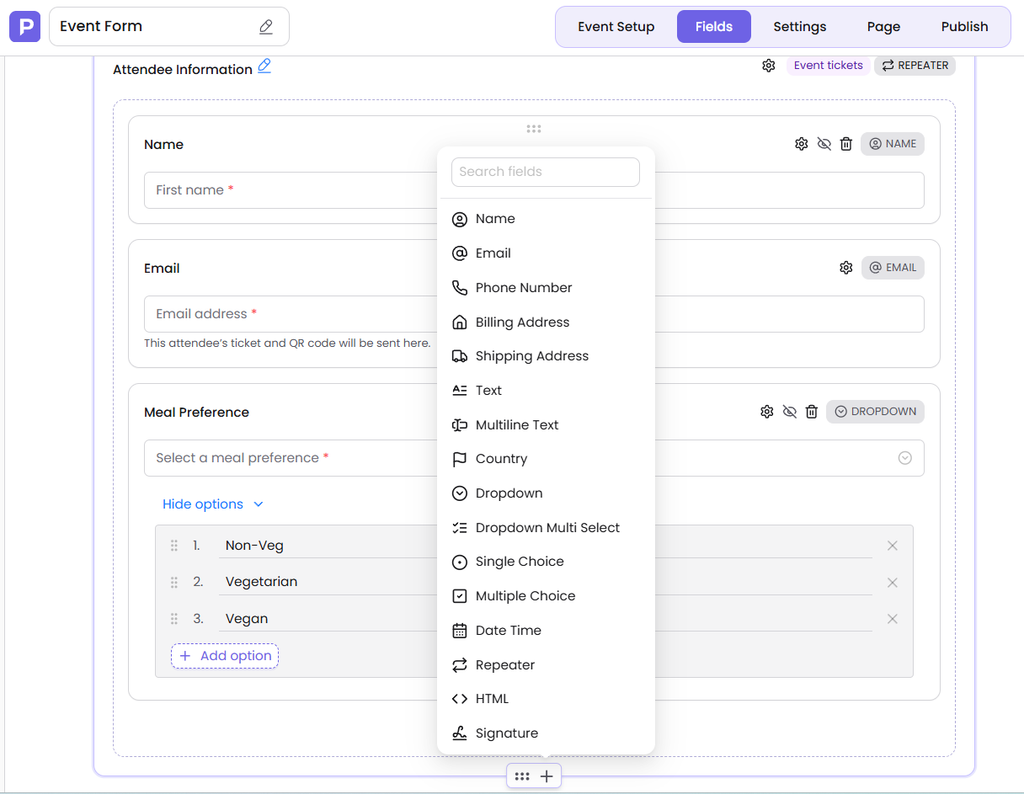
Once your event setup is complete, the next step is deciding what information you want to collect from attendees.
The Fields tab lets you customize your registration form with 12+ field types. You can collect basic attendee information like name and email or add event-specific questions such as meal preferences, session choices, or additional details.
Step 7: Configure your event form settings
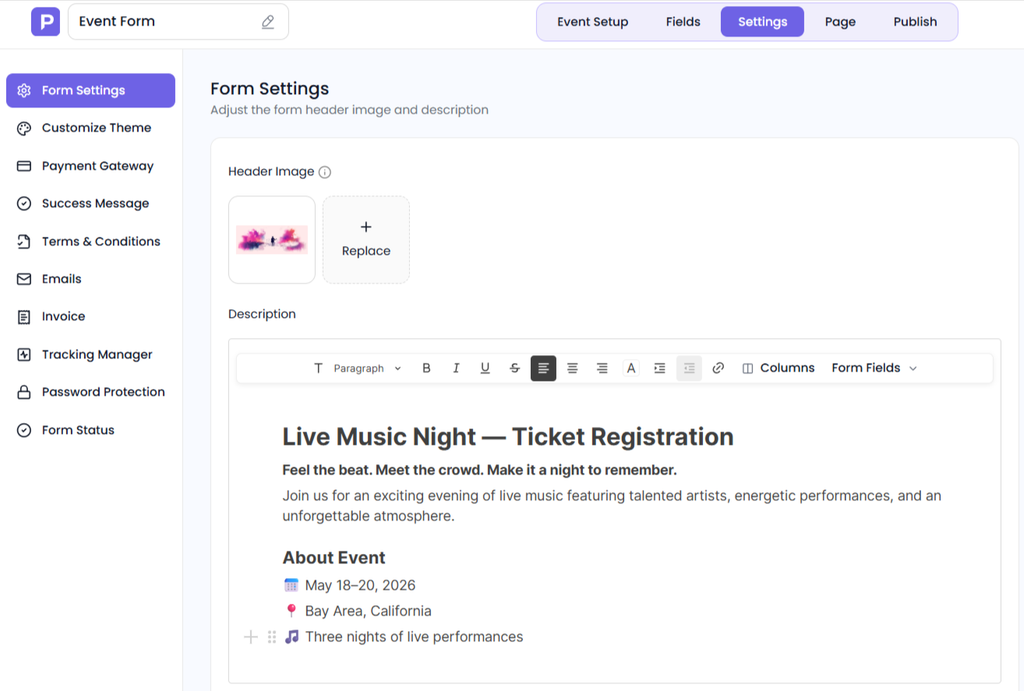
After adding your fields, move to the Settings tab to configure the overall behaviour and appearance of your event form. From here, you can customize different parts of the ticket purchase experience, including:
- Form Settings: Add a header image and event description to give attendees key details before they purchase tickets.
- Customize Theme: Adjust the form appearance to match your event branding.
- Payment Gateway: Connect and manage the payment methods you want to accept for ticket purchases.
- Success Message: Customize the message attendees see after successfully completing their ticket purchase.
- Terms & Conditions: Add event policies, rules, or agreements attendees must accept.
- Emails: Configure custom confirmation emails for both the organizer and buyer.
- Invoice: Customize invoice settings for ticket purchases.
- Tracking Manager: Add tracking tools to measure visitor activity and campaign performance.
- Password Protection: Restrict access to your event form by adding password protection when needed.
- Form Status: Control whether your event form is active, inactive, or closed.
Step 8: Build the event page around the form (Optional)
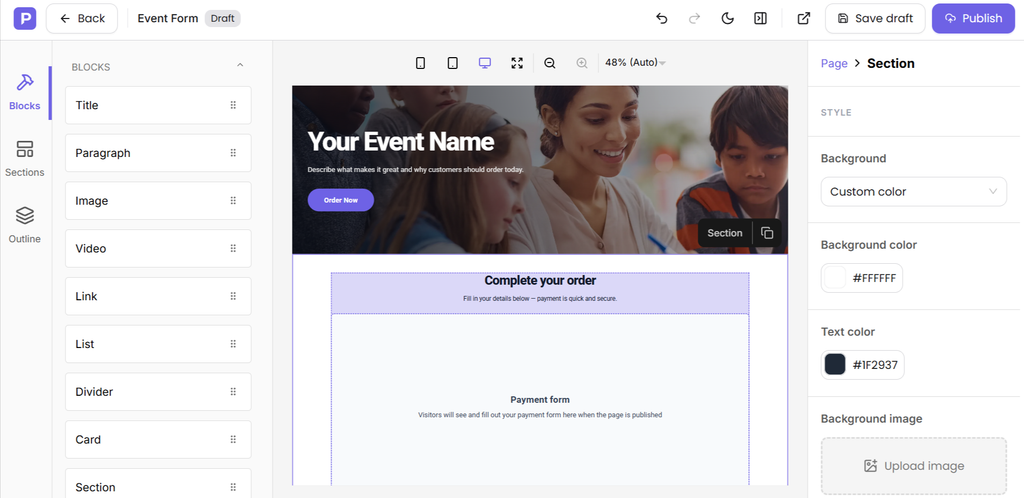
Creating a custom event page is optional. If you already have a website or only want to share your ticket form directly, you can use the form link, embed it, or share it through a QR code.
For organizers who want a complete event experience, the Page tab lets you build a dedicated event page around your ticket form. The built-in drag-and-drop page builder keeps your form in place and allows you to add event details around it. The builder includes three main areas:
- Blocks: Add individual elements such as titles, paragraphs, images, videos, cards, buttons, and different column layouts.
- Sections: Use ready-made sections like hero areas, galleries, testimonials, FAQs, call-to-action banners, event schedules, and performer lineups.
- Outline: Easily navigate and manage the structure when your page contains multiple sections.
Click any element to customize it. Update text, images, buttons, links, colors, alignment, spacing, and other design settings without writing code. For more flexibility, you can also add custom HTML blocks for additional content.
Step 9: Publish and share your event
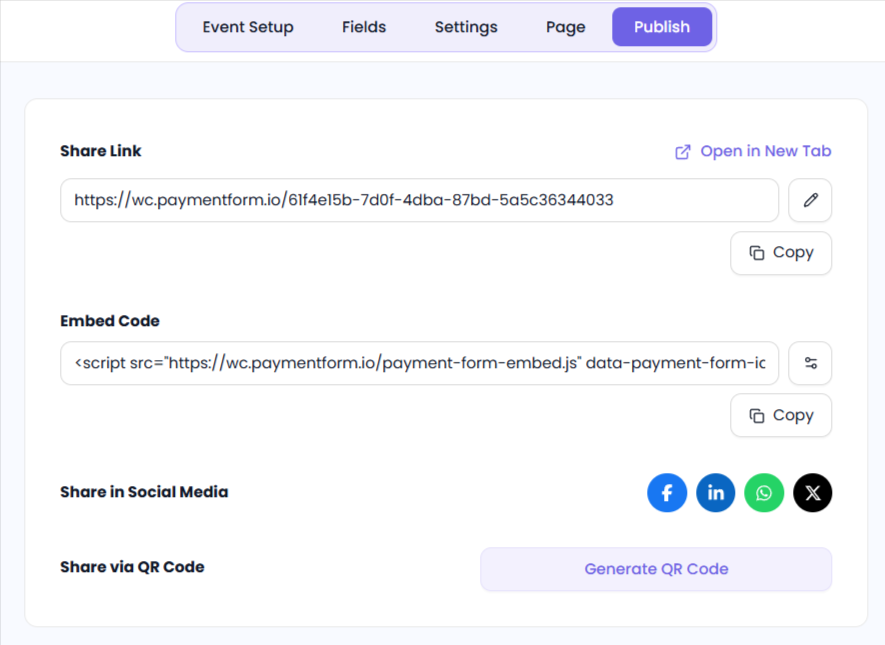
Once everything is ready, open the Publish tab to make your event ticket form available. After publishing, you can share the event form or page in multiple ways:
- Direct Link: Share the event URL anywhere, such as on social media, in emails, or on messaging platforms. You can also customize the link slug to make the URL easier to recognize.
- Embed Code: Add the ticket form directly to your existing website. This is useful if you already have a WordPress site or another website and want visitors to purchase tickets without leaving your page.
- QR Code: Generate a QR code and use it on posters, flyers, printed materials, or offline promotions.
- Social Sharing: Share your event directly through available social platforms to help promote your ticket sales.
If you want to host the event page on your own branded URL, you can also connect a custom domain.
Manage event entry with QR code check-in
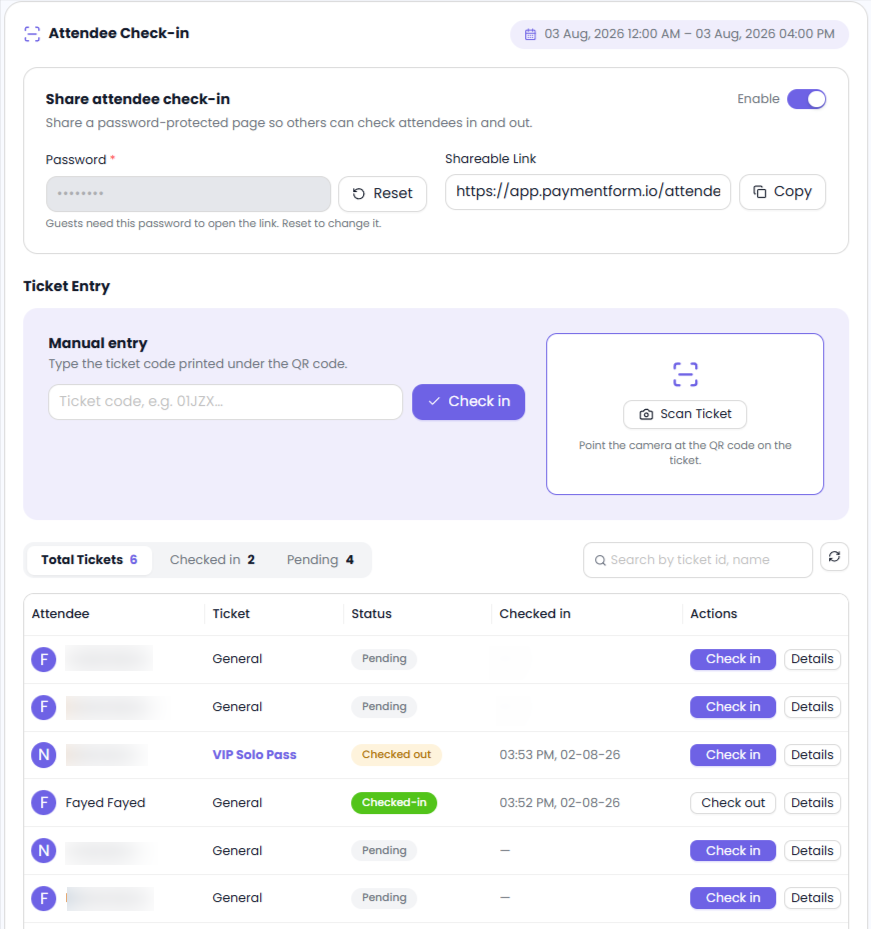
On the event day, the final step is making sure attendees can enter quickly and smoothly. Open Attendee Check-in from the Event Setup sidebar to manage guest entry. The check-in system becomes available based on the event date and time you configured earlier. You can verify tickets in two ways:
- Scan Ticket: Use the device camera to scan the QR code on an attendee’s ticket. This is the fastest option for checking in guests at the entrance. If someone leaves and returns, you can scan the same ticket again to check them back out or manage re-entry.
- Manual Entry: If scanning is not possible, you can enter the ticket code manually using the code provided with the QR ticket.
The attendee list keeps all registrations organized in one place. You can search attendees by name or ticket ID, view ticket details, and check their current status. Each attendee record includes actions to check in, check out, and view additional details.
For larger events, you can share the check-in page with your event staff using the Share attendee check-in option. It creates a password-protected link that allows staff members to scan tickets from their own devices.
Final Thoughts
Selling tickets is about more than collecting money. It is about making sure people have a good time from the second they see your event until they actually walk through the door.
A good ticketing setup makes it super easy for people to find info, buy tickets, and get their digital passes. At the same time, it makes your life easier by handling the payments and the door list for you.
Whether you are running a small class or a huge concert, choosing the right tool saves you a lot of stress. When buying tickets is simple, people show up happy, and your event gets off on the right foot.