





Keeping your WordPress site clean is really important, even if you are new to this. Many people try out different looks for their website and install lots of themes. Then they pick their favourite and forget about the rest. Those old themes just sit there in the background. It might not seem like a problem at first because you are not even using them.
Too many unused themes will take considerable disk space and pose a security risk as outdated unused code will sit inside your WordPress site . A quick cleanup now helps you avoid big headaches later.
If you’re not using a theme anymore, the best practice is to delete it completely rather than letting it sit idle on your server.
In this guide, we’ll walk you through how to delete a theme in WordPress using 3 simple methods, explain why removing unused themes matters, and cover a few important precautions before you hit delete.
Why You Should Delete a WordPress Theme
Keeping old themes on your server is more than just a clutter issue; it’s a matter of site health. While it might seem harmless to leave them sitting there, these files often become an overlooked liability that serves no purpose for your live site.
Here are the main reasons why deleting unused WordPress themes is recommended:
Improved Security
Security is one of the biggest reasons to remove old themes.
Inactive themes still exist on your server, which means they can still contain vulnerable code. If a theme becomes outdated and isn’t patched, hackers may exploit those weaknesses—even if the theme is inactive.
Removing unused themes reduces your attack surface and helps keep your website safer.
Fewer Updates to Manage
Themes require updates just like plugins and WordPress core.
If you keep several inactive themes installed, WordPress will continue checking for updates for all of them. This creates unnecessary update notifications and increases maintenance work.
Deleting themes you no longer use keeps your dashboard cleaner and reduces the number of updates you need to manage.
Better Website Performance
Unused themes don’t directly slow down your front-end website speed, but they can still impact performance in smaller ways.
For example:
- WordPress checks inactive themes for updates
- More files increase backup processing time
- Larger file directories can affect server operations slightly
While the performance impact may be minor, keeping your installation lean always helps.
Saves Hosting Storage Space
Every installed theme takes up server storage.
Modern WordPress themes often include:
- Large CSS/JS files
- Demo content
- Fonts and icons
- Template libraries
- Media assets
If you have multiple inactive themes, they can consume significant disk space over time.
Deleting them frees up storage and keeps your hosting account organized.
Keeps Database Cleaner
Some themes save settings, options, and configurations in your WordPress database.
Even after deactivation, that data often remains stored.
While not every theme heavily impacts the database, deleting unused themes helps reduce leftover clutter and keeps your WordPress environment cleaner.
Deleting vs Deactivating a Theme
Many beginners confuse deleting a theme with deactivating it.
However, they are not the same.
Deactivating a Theme
In WordPress, only one theme can be active at a time.
When you activate a new theme:
- Previous theme becomes inactive
- Files remain on server
- Settings remain stored
- Theme can be reactivated anytime
So deactivating does not remove the theme.
Method 1: Delete a Theme from the WordPress Dashboard
This is the easiest and most beginner-friendly method.
If your website is working normally and you can access the WordPress admin panel, you can delete themes directly from the dashboard.
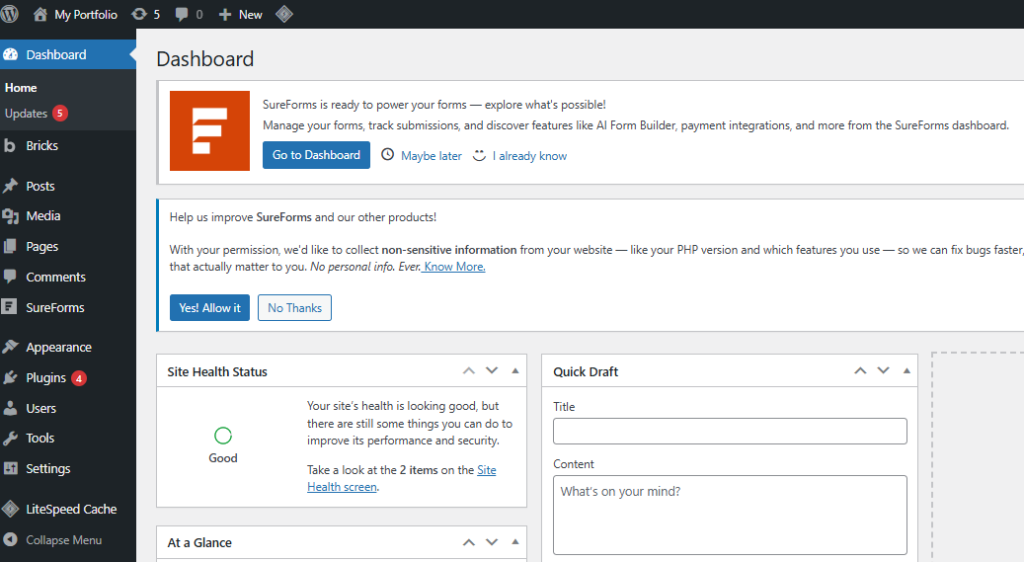
Step 1: Log In to Your WordPress Dashboard
Start by logging into your WordPress admin panel using your website’s login URL.
Step 2: Go to the Themes Section
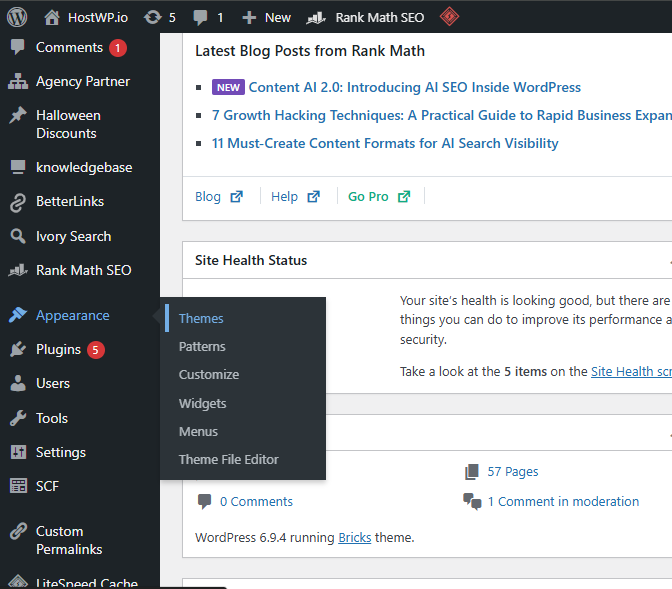
From the left-hand menu, navigate to Appearance → Themes to view all installed themes on your website.
Step 3: Select the Theme You Want to Remove
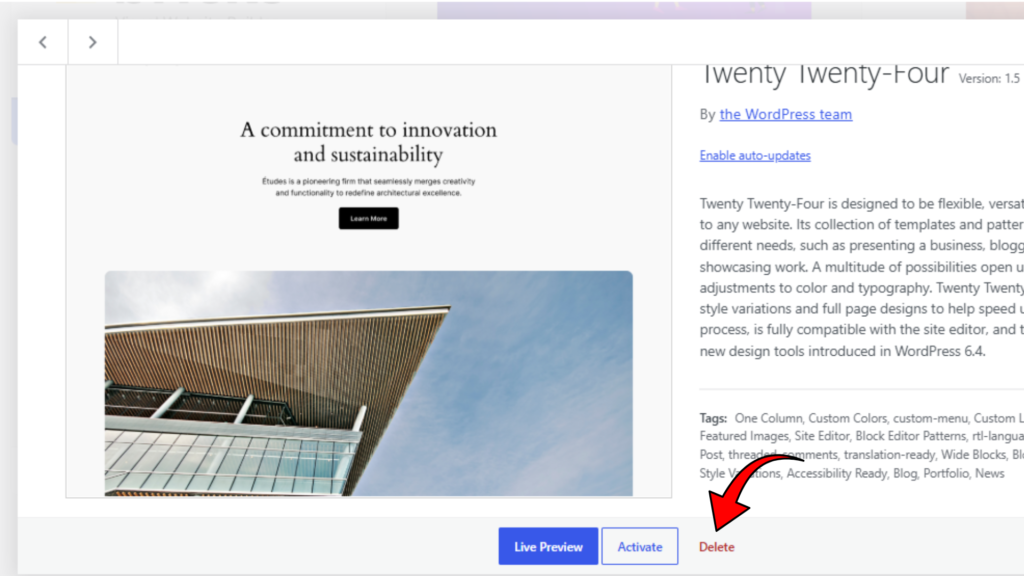
Find the inactive theme you want to delete, then hover over it and click Theme Details.
Step 4: Click the Delete Button
In the theme details popup, look at the bottom-right corner and click the Delete button.
Step 5: Confirm Deletion
A confirmation popup will appear asking if you’re sure—click OK to permanently remove the theme.
Once confirmed, WordPress will permanently remove the theme files.
When to Use This Method
This method is best when:
- You have dashboard access
- Theme is not broken
- You want the quickest option
- You’re not comfortable with server files
Method 2: Delete a Theme Using FTP
If your WordPress dashboard is inaccessible or a theme is causing errors, you can remove it manually using FTP (File Transfer Protocol), which lets you manage your site’s remote files through a tool like FileZilla. It’s a powerful workaround that allows you to bypass the WordPress interface entirely and remove problematic theme folders with just a few clicks.
FTP allows direct access to your website files.
Step 1: Connect to Your Server Using an FTP Client
Open your preferred FTP software (such as FileZilla) and connect it to your hosting server using your FTP credentials.
Step 2: Navigate to the Themes Folder
Once connected, go to your WordPress installation directory and open the following path:
wp-content → themes
Step 3: Locate the Theme You Want to Delete
Inside the themes folder, find the folder of the theme you want to remove.
👉 Before deleting, make sure the theme is not currently active on your website.
Step 4: Delete the Theme Folder
Right-click on the theme folder and select the Delete option from the menu.
Step 5: Confirm the Deletion
Your FTP client may ask for confirmation before removing the files—approve the action to continue.
Step 6: Verify Removal in WordPress
Once deleted, the theme will no longer appear in your WordPress dashboard under Appearance → Themes.
The theme will be removed directly from the server.
When FTP Method Is Useful
Use FTP if:
- Theme causes critical errors
- Dashboard is inaccessible
- Theme deletion fails in admin panel
- You prefer direct file access
Method 3: Delete a Theme via Hosting File Manager
Most hosting providers offer a built-in File Manager inside the hosting control panel.
This method works similarly to FTP but is often easier because no external software is required.
Step 1: Log In to Your Hosting Account
Start by logging into your hosting provider’s control panel or dashboard.
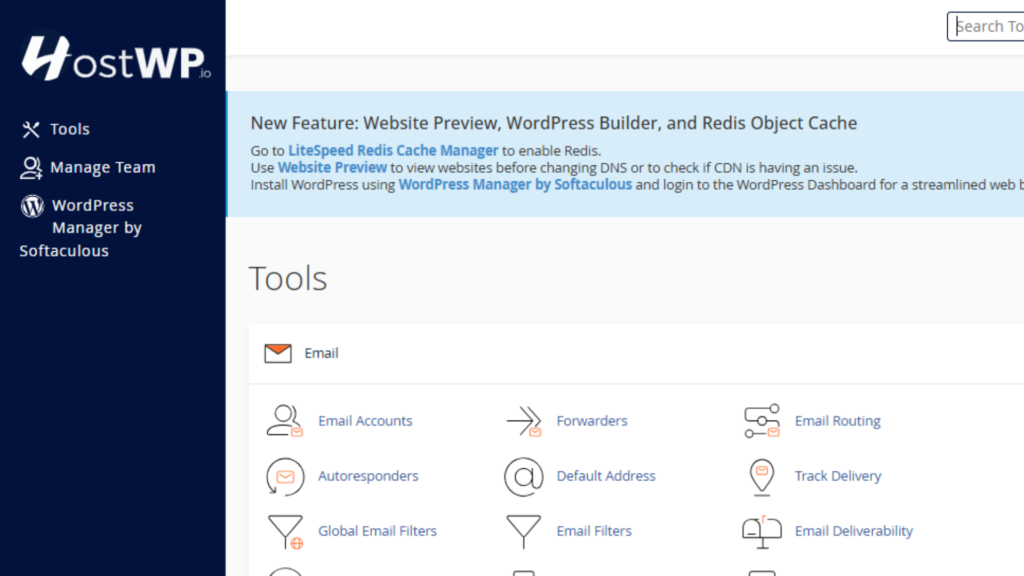
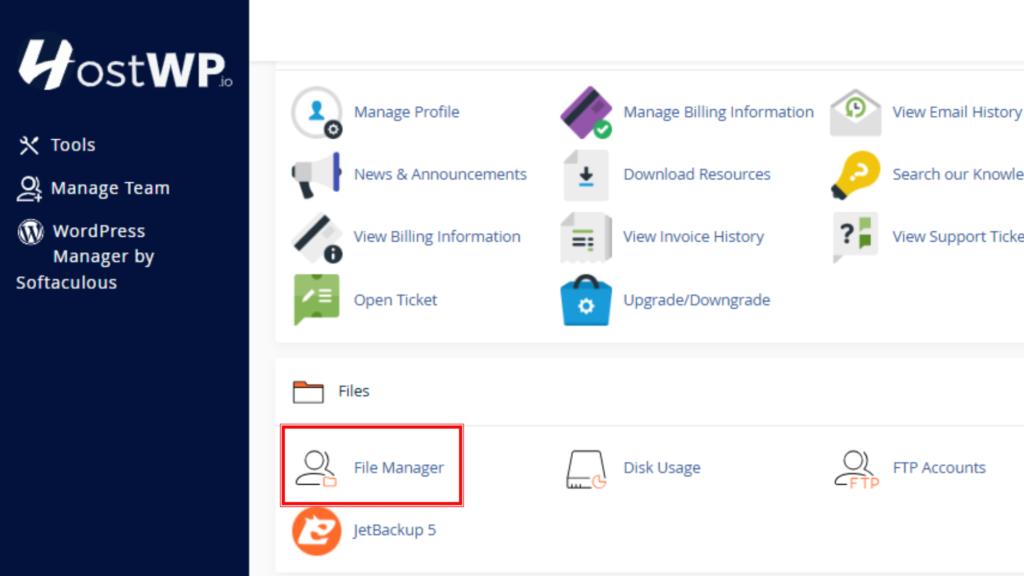
Step 2: Open File Manager
Locate and open the File Manager tool from your hosting dashboard.
Step 3: Navigate to the Themes Directory
Go to your WordPress installation folder and follow this path:
public_html → wp-content → themes
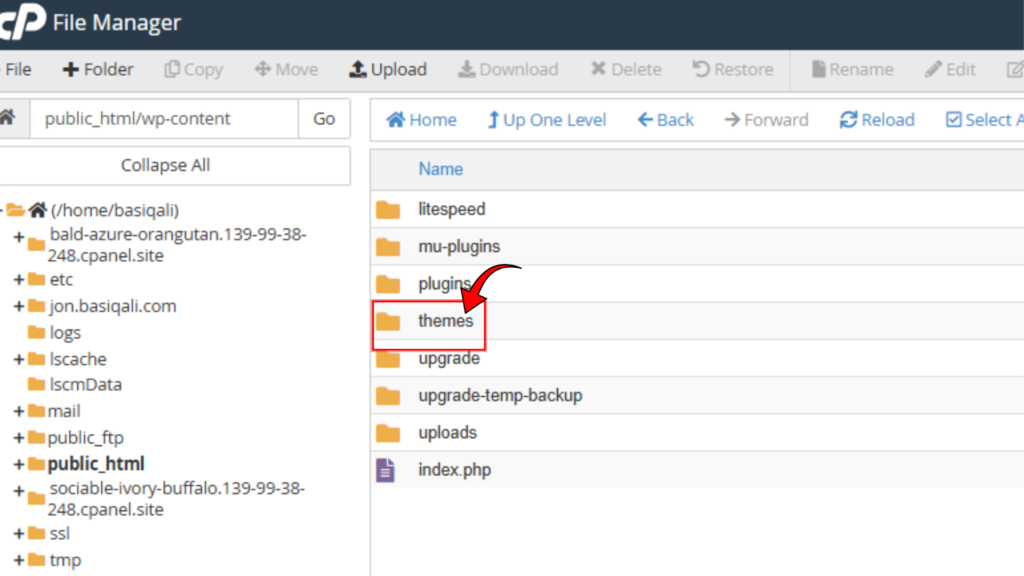
Step 4: Locate the Theme Folder
Inside the themes directory, find the folder of the WordPress theme you want to remove.
Step 5: Select the Theme Folder
Click on the folder to select it before performing any action.

Step 6: Delete the Folder
Click the Delete option in your File Manager toolbar and confirm the action when prompted.

Step 7: Verify the Theme Has Been Removed
Return to your WordPress dashboard and check Appearance → Themes to ensure the theme no longer appears.
Why Many Users Prefer This Method
Hosting panel deletion is popular because:
- No FTP software needed
- Faster for simple tasks
- Easy drag-and-click interface
- Good for beginners comfortable with hosting panel
Important Things to Check Before Deleting a Theme
Before removing any WordPress theme, make sure you check these important things first.
Deleting the wrong theme can cause issues if you’re not careful.
Make Sure It’s Not Active
WordPress will not let you delete the active theme.
If the theme is currently active:
- Switch to another theme first
- Then delete the old one
Check Parent / Child Theme Relationship
If you use a child theme:
- Do not delete the parent theme
Child themes depend on parent theme files to function.
Deleting the parent will break your website design.
Take a Full Backup
Always back up your website before making permanent changes.
Back up:
- Website files
- Database
- Media uploads
This gives you a recovery point if something goes wrong.
Keep One Default WordPress Theme Installed
It’s recommended to keep one official WordPress default theme installed.
Examples:
- Twenty Twenty-Four
- Twenty Twenty-Three
Why?
Because if your active theme breaks, WordPress can fall back to a default theme for troubleshooting.
Cleaning Up Leftover Theme Data
Deleting theme files removes the main theme—but sometimes leftover data remains behind.
This can include:
- Theme settings
- Widgets
- Database options
- Demo content
- Imported images
To fully clean your site:
Recommended Cleanup Steps
- Remove demo images from Media Library
- Delete unused theme-related plugins
- Clear all caches
- Optimize database
- Remove orphaned theme settings with cleanup plugins
Frequently Asked Questions
Can I delete the active WordPress theme?
No. WordPress requires one active theme at all times.
Is it safe to delete unused themes?
Yes—if they are inactive and not needed by a child theme.
Will deleting a theme remove my content?
No. Posts, pages, and media remain untouched.
Should I keep multiple themes installed?
No. Best practice is to keep only:
- Active theme
- One default fallback theme
Delete the rest.
Final Thoughts
Deleting unused WordPress themes is a simple maintenance task, but it has real benefits for security, organization, and overall website health.
Many site owners leave old themes installed because they think they may need them later—but in most cases, those themes never get used again. Instead, they create clutter, consume storage, and add unnecessary security risk.
As a rule of thumb:
Keep only the themes you actively need.
For most websites, that means:
- Your current active theme
- One default WordPress fallback theme
Everything else can go.
By regularly cleaning up unused themes, plugins, and files, you’ll maintain a leaner, safer, and easier-to-manage WordPress website.