After installing an SSL certificate on your WordPress website, the usual next step is to force all HTTP URLs to HTTPS by applying a 301 redirect. In this guide, we will show an easy way to redirect all your links within WordPress and how to fix mixed content issues. If you’re looking for a simple solution for a WordPress HTTP redirect to HTTPS, we’ve got you covered.
There are multiple advantages of why you should use HTTPS rather than HTTP: one – you keep your website visitor data safe, two – Google prioritizes HTTPS websites to rank higher on search engine pages, and three – you follow the modern standards of building a website.
You’ll notice a small padlock icon in the browser bar when a site uses HTTPS. That’s a sign that the connection is encrypted and secure. This security comes from something called an SSL certificate, which helps protect data as it travels between the user and the website.
Why HTTPS is Important
HTTPS (Hypertext Transfer Protocol Secure) is an advanced version of HTTP that provides a secure communication channel over the Internet. It ensures that the data transmitted between a website and its users is encrypted and protected from cyber threats such as hacking, data interception, and identity theft.
Importance of HTTPS
Using HTTPS on your WordPress website is crucial for the following reasons:
- Security: Encrypts sensitive data such as login credentials, payment information, and personal details.
- Trust and Credibility: Websites with HTTPS display a secure padlock symbol in browsers, increasing user confidence.
- SEO Benefits: Google prioritizes HTTPS-enabled websites in search rankings.
- Compliance with Regulations: Many data protection laws, such as GDPR, require secure transmission of user data.
How To Force HTTP To HTTPS Redirect On WordPress Website
Switching to HTTPS is easier than ever. Here’s what you need to do:
- Get an SSL Certificate (most web hosts provide a free one via Let’s Encrypt)
- Install the SSL Certificate through your web hosting control panel (like cPanel)
- Update Your Website Links to use https:// instead of http://
- Test Your Site to ensure everything works smoothly
Step 1: Obtain an SSL Certificate
To enable HTTPS, you need an SSL (Secure Sockets Layer) certificate. There are several ways to get one:
- From Your Hosting Provider: offer free SSL certificates via Let’s Encrypt.
- Through Cloudflare: Cloudflare provides a free SSL certificate and CDN services.
- Purchase from Third-Party Providers: If your host doesn’t offer a free SSL, you can buy one from vendors like DigiCert, GlobalSign.
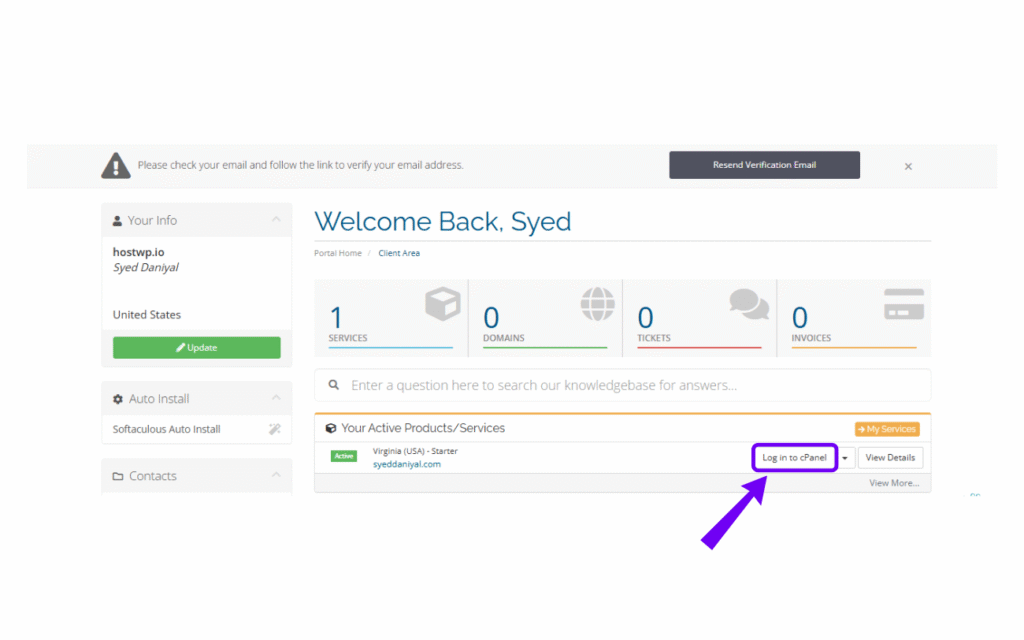
1.1: Access Your cPanel Account
Note: If you are a HostWP.io customer, then you probably have an SSL installed and you can jump to STEP 3, but in case it is not, you can follow the steps below.
Log in to your cPanel account.
1.2: Install the SSL Certificate
- Navigate to the SSL/TLS Section:In cPanel, locate and click on the “SSL/TLS” option.
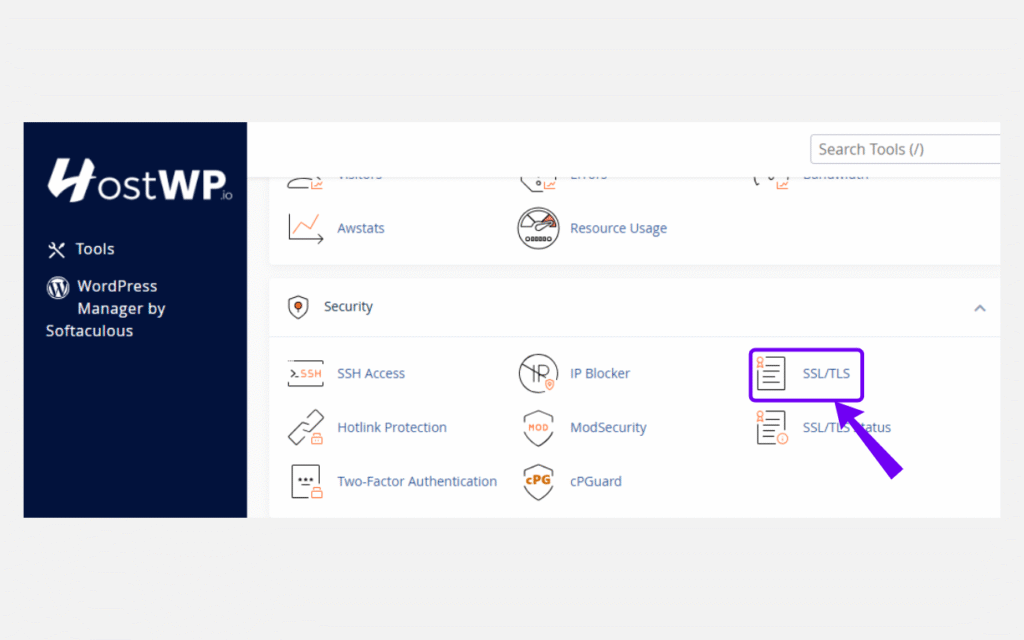
- Manage SSL Sites:
Click on “Manage SSL sites” or “Install and Manage SSL for your site (HTTPS)”.
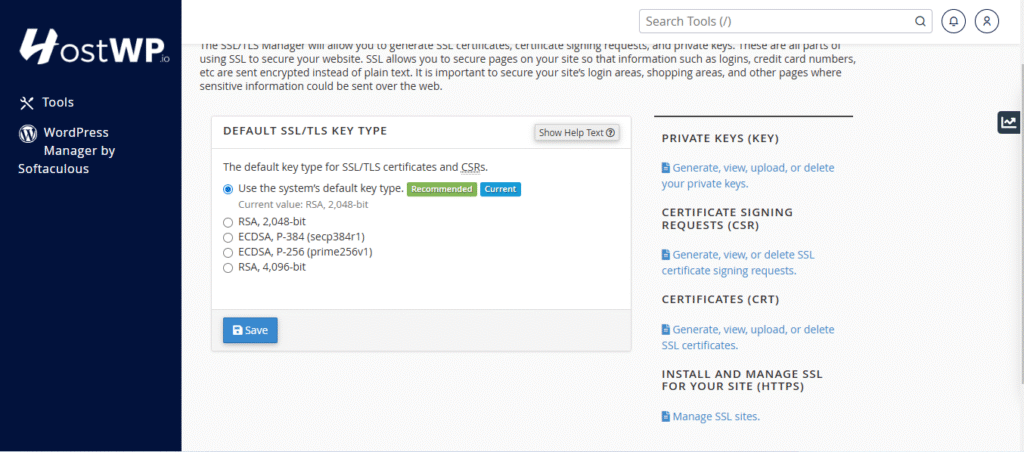
- Auto-Install Let’s Encrypt SSL:
- HostWP.io provides free SSL certificates.
- Look for the “Manage SSL Sites” under Install and Manage SSL For Your Site (HTTPS).
- Select your domain from the list and click “Autofill by Domain” and then click “Install Certificate” doing this will issue a new SSL certificate for your domain.
Step 2: Change HTTP to HTTPS in WordPress Settings
Log into Your WordPress Admin Panel:
- Navigate to https://yourdomain.com/wp-admin and log in.
Update WordPress & Site Address (URL):
- Go to Settings > General.
- Change both the WordPress Address (URL) and Site Address (URL) from http:// to https://.
- Click Save Changes.

Step 3: Verify the SSL Installation
- Check Your Website:
- Visit https://yourdomain.com and ensure there’s a padlock icon in the address bar, indicating a secure connection.
- Test for Mixed Content:
- Ensure all resources (images, scripts, stylesheets) are loading over HTTPS.
- If you encounter mixed content warnings, consider using the Really Simple SSL plugin to fix these issues.
That should cover all the steps of moving your WordPress website from HTTP to HTTPS.
Additional Steps To Do After Migrating WordPress From HTTP to HTTPS
Update Google Search Console & Analytics With HTTPS Link
To ensure search engines recognize the HTTPS version of your site:
- Add the new https:// version of your website to Google Search Console.
- Update your Google Analytics property settings to reflect the HTTPS URL.
- Resubmit your sitemap with the updated URLs.
Why HTTPS is a MUST for Every Website
1. It Keeps Your Users’ Data Safe
Without HTTPS, any data sent between your website and a visitor can be hijacked by cybercriminals. This is especially dangerous for:
- E-commerce sites (handling credit cards)
- Login pages (storing usernames & passwords)
- Contact forms (where users submit personal details)
If your site handles any sensitive information, HTTPS isn’t optional—it’s essential.
2. Boosts Your Google Rankings (Better SEO)
Google officially announced that HTTPS is a ranking factor. This means:
- Websites with HTTPS get a higher ranking than those without it.
- If your site is still using HTTP, Google might push it down in search results.
- Secure websites load faster, which improves SEO and user experience.
3. Chrome Flags HTTP Websites as “Not Secure”
If you visit an HTTP site in Google Chrome, you’ll see a “Not Secure” warning in the address bar.
Would YOU enter your credit card info on a site labeled “Not Secure”? Probably not. Your visitors feel the same way.
4. Required for Online Payments
If you’re accepting payments online via:
- PayPal, Stripe, Square, or Apple Pay
- WooCommerce, Shopify, or Magento
- Any other e-commerce platform
You must have HTTPS.
FACT: Most payment processors won’t even let you accept payments without HTTPS.
5. Increases Trust & Credibility
When visitors see a padlock icon next to your website URL, they feel safe. A secure site makes them more likely to stay, shop, or sign up.
Enabling HTTPS on your WordPress website is a crucial step in securing your site, boosting your SEO rankings, and building trust with your visitors. Not only does it protect sensitive data by encrypting the connection between your website and your users, but it also helps prevent hackers from intercepting information.
Plus, search engines like Google prioritize HTTPS-enabled sites, meaning your site is more likely to rank higher in search results. Visitors also feel more confident when they see the padlock icon in the address bar, signaling that your site is safe to browse. By taking the time to implement HTTPS properly, you ensure your website meets modern security standards, enhances its credibility, and provides a seamless, secure experience for every visitor.
Our WordPress experts at HostWP.io take security as a priority and we don’t take any shortcuts. With CPguard, daily backups, SSL installations, Two-Factor authentication and complete end-to-end encryption of our customers’ data, we make sure that all your WordPress websites are secured from any threats that may occur. Talk to us through live chat to know more.