
If you are running an online course website on WordPress, you probably want to make some courses available for free to anyone so as to build trust with new potential customers and encourage them to sign up for your paid courses. If you are using Tutor LMS to manage your online courses on WordPress, it is very easy to give free public access to any course on your website. You simply set the price to free and make the course available to public access in the course settings. You will learn how to do that in this guide.
However, when you give free public access to a video course, anyone can watch it without signing up or without any means for you to reach the person to contact and follow them up. If you are familiar with the concept of email marketing, then you already know that there is a need to collect your website visitor’s email address when giving them something of value for free.
Email marketing remains one of the best ways to reach out to both existing and potential customers and maximize profits. It’s a freaking goldmine! That is why you need to find a way to collect your website’s visitors’ email addresses in any way possible. You can show popup subscription forms to visitors when they first come to your website; you can place email sign-up forms on your landing pages; you put them within and at the end of blog posts, you pop them up on exit intent, i.e. when a user takes his mouse arrow to the top right corner to exit your website, you invite them to join your newsletter, etc.
In email marketing, you are also encouraged to give something of value for free in return for a visitor’s email address. That means that you offer something that a user will like for free; like a discount coupon, free template, free ebook, free guide, free audio or video with valuable information, etc.
Video courses are examples of free informational videos you can give in return for an email address. Many content creators who give out video courses for free usually use landing pages to do so. On the landing page, they provide some web copy explaining what the user stands to gain from watching the video and then encourage them to enter their name and email address to gain access to the video. This is not the case when it comes to using Learning Management Systems (LMS) like Tutor LMS.
If you publish a free course using Tutor LMS, anyone can access the course without any prior prompt to submit their names and email addresses. You can only get a user email address if you allow users to create free accounts first on your website with the use of a user profile plugin like ProfilePress before giving them free access to your course. However, if you do not want unnecessary user accounts accumulating on your website’s database, you may not like this approach. Furthermore, you may have to manually copy and add these email addresses to your email marketing service provider, which is a lot of work!
Just like in landing pages, it would be nice if you could get users to submit their name and email address and subscribe to your email autoresponders before they get access to your free video course. This way, you can easily use your email autoresponder series or direct email campaigns to promote your paid courses to them. This feature is not available in Tutor LMS by default, but with a little bit of tweaking, it can be done.
In this post, I will give you an in-depth tutorial on how to slightly tweak the Tutor LMS template to hide your free public courses on Tutor LMS behind an email subscription wall and build an email list to boost the sales of your paid courses. We will be making use of the Brevo (formerly Sendinblue) email marketing service and their free WordPress plugin for email subscription forms.
Let’s dive right in.
How to Make Course Free and Available To the Public in Tutor LMS
In this blog post, we assume that you already have Tutor LMS set up and you also know how to create online courses in Tutor LMS. If you need help installing and setting up Tutor LMS on WordPress, read this post on how to create an online course website with Tutor LMS.
To make any course free and available for public access, you need to first head over to Tutor LMS > Settings from your WordPress dashboard sidebar. Then click on the Course tab and toggle off Course Visibility. Click the Save Changes button at the top of the page.

Next, you need to select the course that you would like to make available for free public access and open it up in the Course Editor mode. You can do this from your WordPress dashboard or by using the instructor access Course Editor’s page provided by the Tutor LMS plugin.
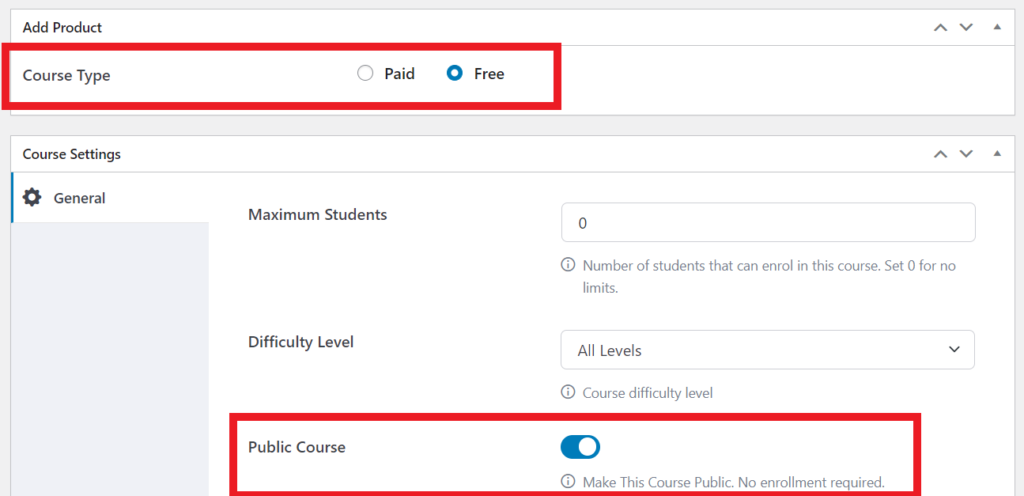
On this Editor’s page, first go to the Add Product section. Set the Course Type to Free. Then, in the Course Settings Section, toggle on Public Course to make it available to the public. Then click on the Update button to save your changes, and voila, that course is available for free to the public.
This means that anyone can now watch your course without having to register on your website. You can confirm this by opening the course in your web browser incognito mode. You should be able to click on the button to take the course without having to log in or create an account.
How to Create Email Subscription Forms for Tutor LMS Free Public Courses With Brevo
The next thing you want to do is create email subscription forms using the Brevo (formerly SendinBlue) WordPress plugin. As mentioned earlier in this blog post, I will be making use of the Brevo email marketing service and their free WordPress plugin for the email subscription forms that will be used for the free courses.
Step 1: Install and Activate Brevo WordPress Plugin
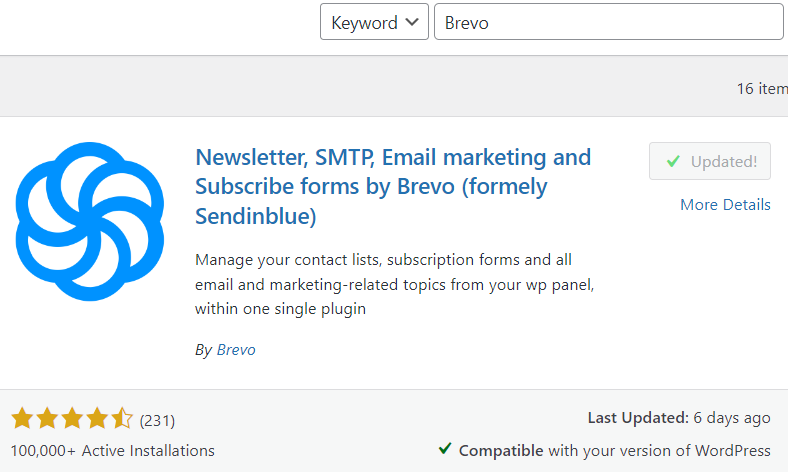
Because it’s a free plugin, you can install the Brevo WordPress plugin directly from your WordPress dashboard. To install the plugin, select Plugins > Add New in the WordPress dashboard sidebar. In the WordPress plugin repository, search for Brevo. Click on Install and then Activate after it finishes installing. Once you activate the plugin, you will get a new Brevo link at the bottom of your WordPress dashboard sidebar.
Step 2: Create a Free Brevo Account
Before you can make use of the plugin, you need to configure and connect it to your Brevo account. If you do not already have a Brevo (formerly Sendinblue) account, you can create one on their website for free. Brevo has both free and paid plans. You can start with a free account. The free plan comes with the following features:
- 300 free emails/day
- Customizable email templates
- Drag & drop editor
- Transactional emails
- SMS & WhatsApp campaigns
The paid plans come with more features obviously. If you are interested, you can explore Brevo’s paid plans for the one that best suits your needs. For this article, we will be sticking to the free plan.
Step 3: Create an email list in Brevo
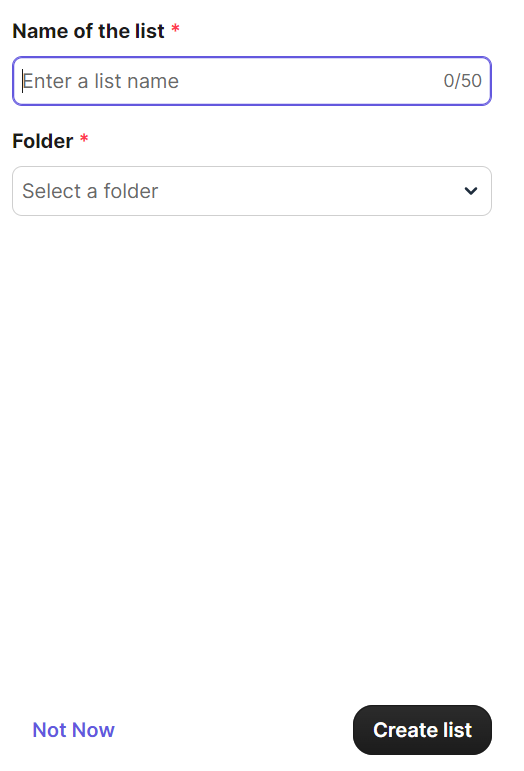
On your Brevo dashboard, you may need to create a list(s) and name it corresponding to the course(s) you intend to give for free. This way, you can segregate and reach out to them based on their interests. You can create an email list by Clicking on Contacts > List > Create New List from your Brevo dashboard.
Step 4: Connect Brevo WordPress Plugin to Your Brevo Account
After creating your Brevo account, return to your WordPress dashboard and click on the Brevo link in the sidebar. Click on the > Get your API key from your account link in step 2 on the Brevo page and open it in a new tab.
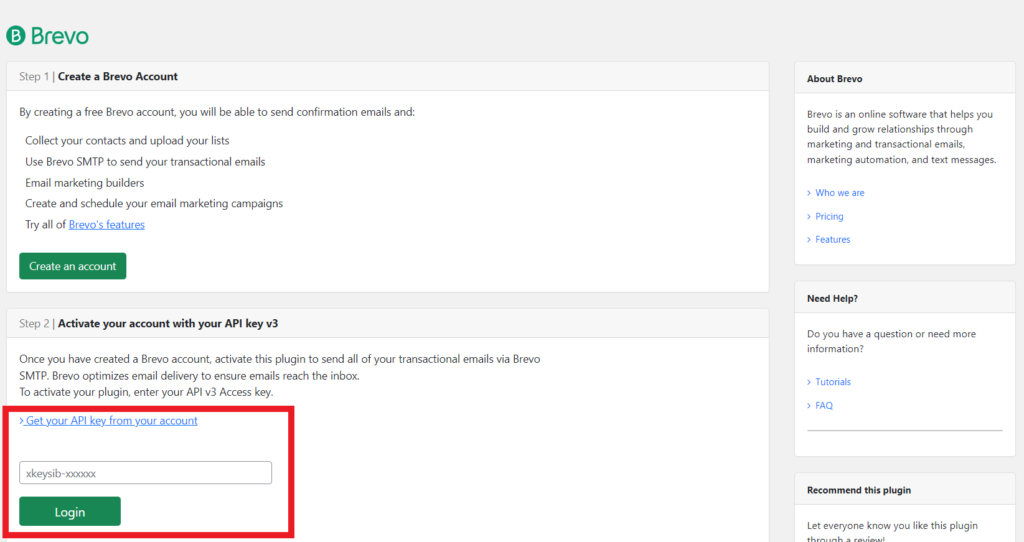
You will then create a new API key, copy it and return to your WordPress dashboard to paste the API key in the provided field. Then click on the Login button. Your website will be connected to your Brevo account.
Step 5: Create email subscription forms with the Brevo WordPress Plugin
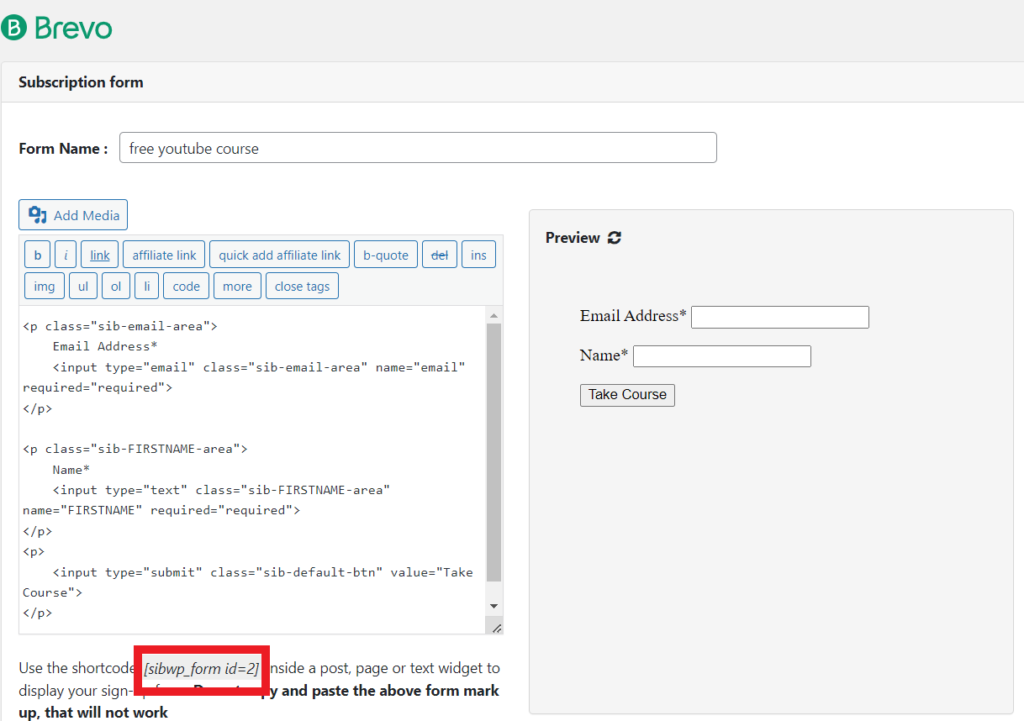
The next thing to do now is to create Brevo’s email subscription forms directly on your website. When you activate Brevo’s plugin on your website, a default form is preinstalled. You can edit and modify it, duplicate it to create another similar form, or create a new form from scratch. You can always make more forms from scratch or from duplication and modify an already existing form.
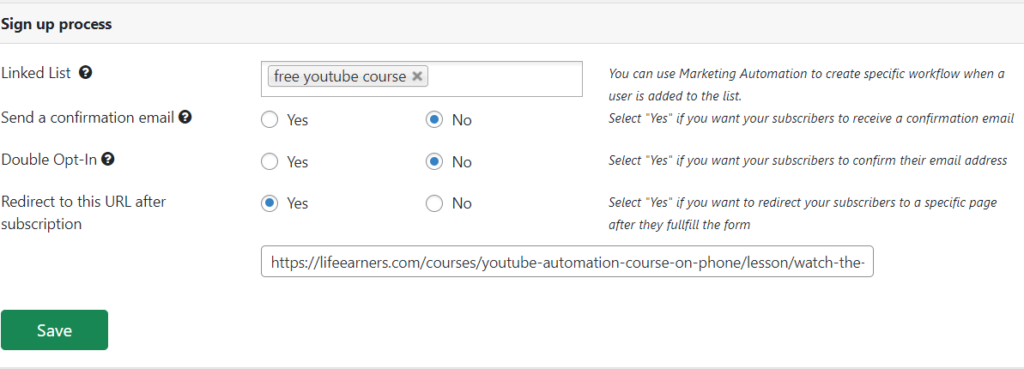
When you open up a form setup editor, you can set it to accept names email addresses and any other type of information you may want to be added to your email list. In the Signup process section, you can see the list(s) you have previously created on your Brevo account in the Linked List field. You can now select the list(s) to which the user wants to be added when they supply their details.
You may want to select the No to Double Opt-In option to speed up user access to your free course. They already know they were subscribing to your email list when they provided their information (of course you are going to pre-inform them) in exchange for the video. However if you are concerned with visitors providing fake email addresses, then you can select Yes to Double Opt-In instead.
The next part is to set the Redirect to this URL after subscription. This is the main reason I chose Brevo for this exercise. Most other email subscription service alternatives don’t have this option in their free plan. You want to select Yes and enter the direct video link in the field provided. To get the video link, you can open the free course in incognito mode, then hover and right-click your cursor over the Start Learning button and copy the link. You can also click on the button to open the course and copy the link from your web browser’s address bar. Either way, you get the same link, and this is the link you want to put in the redirection field.
You can customize or leave the default confirmation messages. Finally, click on the Save button and your form is ready. If you intend to give out more than one online course for free in exchange for email subscriptions, you can create more forms and repeat the process above. You will be provided with a corresponding shortcode for each form you create so you can put the form anywhere on your website. Since PHP codes aren’t provided, we have to make do with the shortcodes.
Alright! So your free courses are ready and your email forms are ready. Now, you need to replace the Start Learning buttons in the free online courses with their corresponding email subscription forms. This is where it gets technical a little but don’t worry, it’s quite easy.
How to Hide Tutor LMS Free Public Courses Behind Email Subscription Forms
Step 1: Get Your Free Public Courses IDs
For easy working, if you have more than one free course, I will advise you to create an excel sheet or open up a notepad and write the title (or any identifying phrase or keyword) of each free course with the post ID of the course and the shortcode of its corresponding email form next to it.
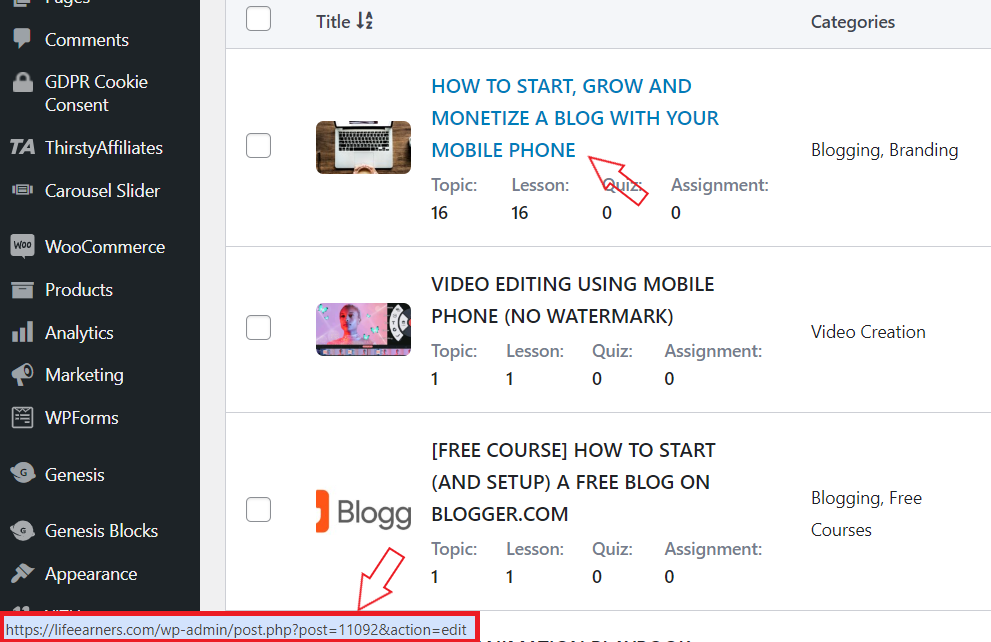
To get the post ID of any course, head to the All Courses page from your WordPress dashboard, and simply hover your cursor over the course title or Edit link. You can also open the Course Editor page. Look at the URL that displays when you hover on it or comb through the URL in your web browser’s address bar if you opened the Editor page. You will see something similar to this: https://yourdomain.com/wp-admin/ post.php?post=11092&action=edit. The number there is that particular course post ID.
Step 2: Copy Tutor LMS Templates to Your Child Theme
The next thing you want to do is to copy the Tutor LMS templates to your current Theme’s folder. You are strongly advised to install or create a child theme for your current theme if you are not already using one. This is because any changes you make on the template files pertaining to this tutorial may be lost whenever you update or upgrade your theme.
How to create a child theme for your current theme
Creating a child theme is very easy. After creating your child theme, go to Themes > Add New and use the upload theme form to select your zipped child theme and click the Upload button. After your child theme has been uploaded, activate it. If you are already using a child theme, then skip this step.
Now that you have successfully created and activated your child theme as the current theme, you may proceed in copying Tutor LMS template files from the Tutor LMS plugin to your child theme.
Step 3: Edit Tutor LMS templates in your child’s theme
Now, I am going to show you how to edit Tutor LMS templates. If you are a web developer, you can do this via your cPanel or using a FTP client. But for simplicity’s sake, we are going to be using a free WordPress plugin to copy and modify the Tutor LMS template files. Go to your WordPress plugin repository and search for the File Manager (by mndpsingh287) plugin.
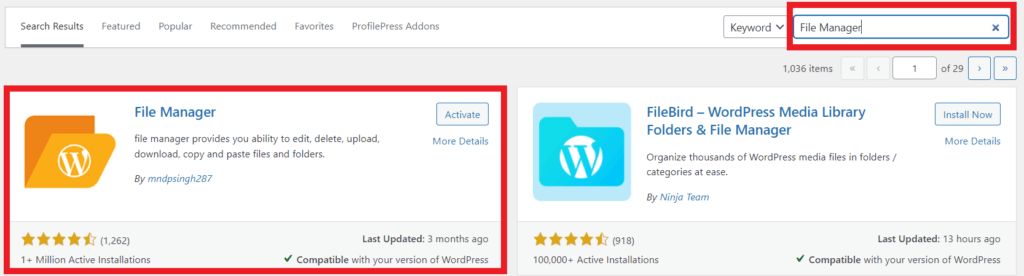
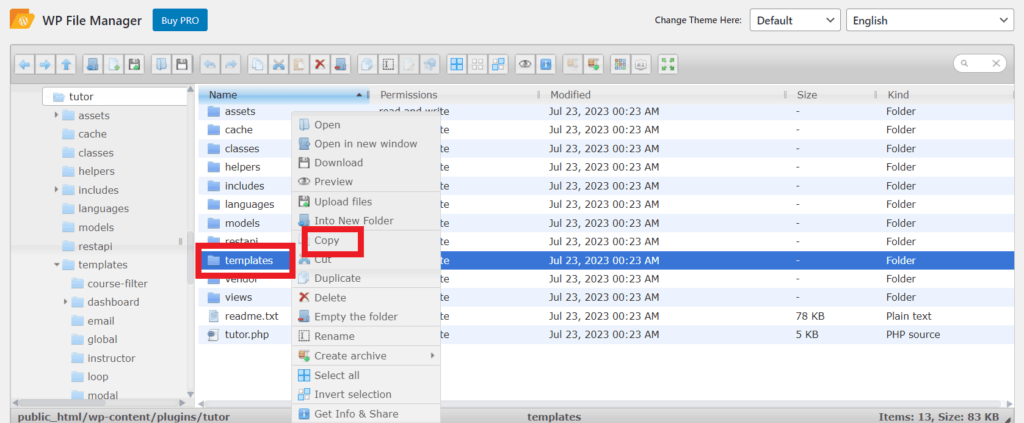
Install and activate it. Now, you will get a new File Manager link at the bottom area of your dashboard sidebar. Click on it and it will open up your website’s WordPress directory. Select wp-content > plugins > tutor. In the tutor folder, select and right-click the templates folder. Then, click on Copy.
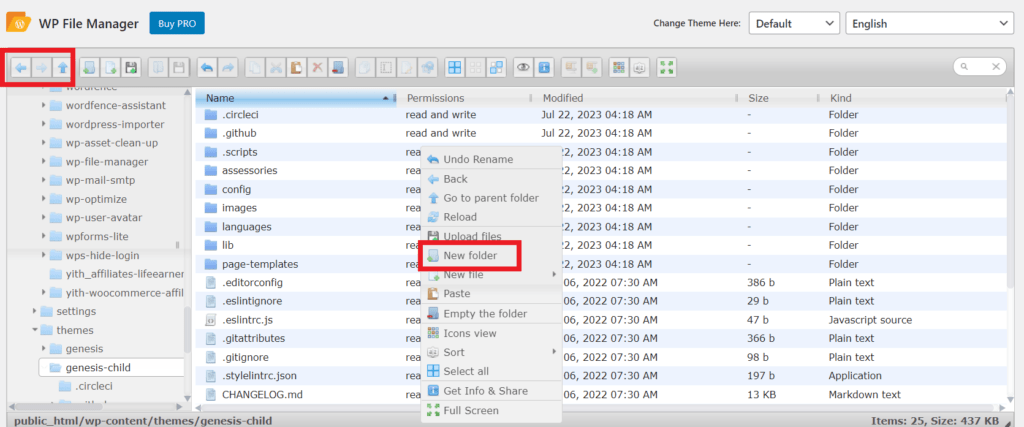
You want to locate the icons at the top of the directory in File Manager. Click on the back-facing arrow to keep going back or the up-facing arrow to return to a parent folder. Keep clicking on either as you are taken back until you get to the page with the wp-content folder. Alternatively, you can scroll to the left panel in the File Manager and select public_html or wp-content. Select wp-content > themes > your child theme.
Right-click anywhere away from the file names and select New Folder from the dropdown option. Name the new folder tutor and click enter. File Manager will then create the folder.
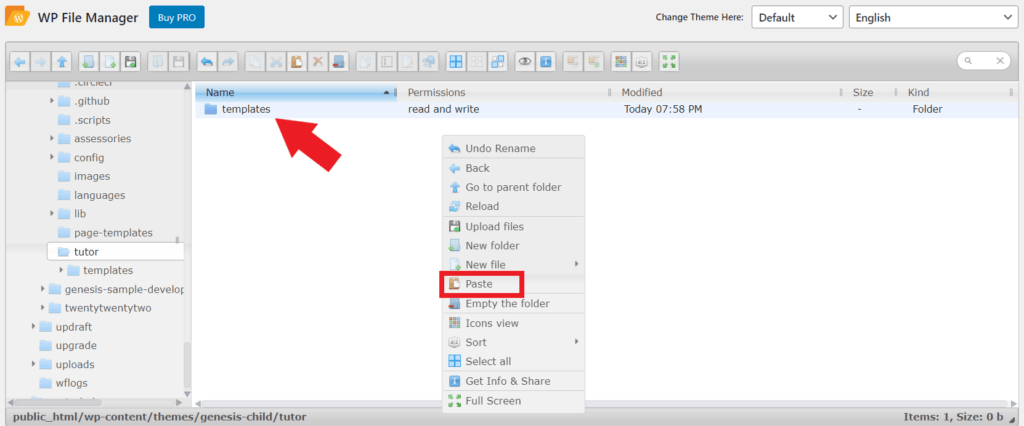
Select and open your newly created tutor folder. On the empty folder, right-click and select Paste. The templates folder we copied earlier will be pasted here.
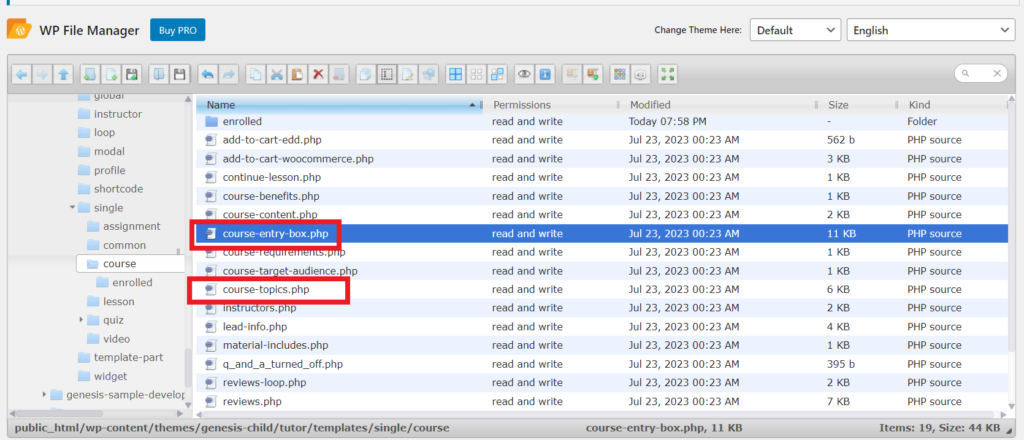
Next open templates > single > course. For this tutorial, we are going to be modifying two PHP files in this folder: the course-entry-box.php file and the course-topics.php file. The course-entry-box.php contains the Start Learning button while the course-topics.php file contains the videos links in the topics outline.
How to change the Start Learning button to Email Subscription Forms
Simply right-click and download the course-entry-box.php PHP file to your computer. You can either modify it on your computer or directly on the File Manager plugin using the Code Editor option when you right-click on the PHP file. Either way, have a saved backup copy in case anything goes wrong.
Now it’s time to edit the course-entry-box.php PHP file to change the Start Learning button in our Tutor LMS free courses to subscription forms. In your code editor, search for the following line of code:
<?php esc_html_e( ‘Start Learning’, ‘tutor’ ); ?>
<?php esc_html_e( 'Start Learning', 'tutor' ); ?>
You want to delete or change the href anchor element to HTML comment. Then create a new line under it to paste the code that will show the forms.
What we want to do is to get the course ID using PHP and then use if…else…elseif conditions to check it against the free courses ID and to show the shortcode of the corresponding Brevo’s subscription form for that free course. So it will look somewhat like this:
<?php

$course_id  =  get_the_ID();

 if ( $course_id == COURSE 1 ) {

show subscription form for COURSE 1

 } else if ( $course_id == COURSE 2 ) {

show subscription form for COURSE 2

} else {

show subscription form for COURSE 3

} ?>
Of course, you can nest the code further with more elseif conditions if you have more forms. If you are using just one, then you simply eliminate the else and elseif conditions. But in my case I have two free courses and two corresponding Brevo’s subscription form shortcodes (sibwp_form id=2 and sibwp_form id=3). To use shortcodes in PHP, you use the following line of code:
echo do_shortcode('[shortcode]');From my end, I will use just one course ID (10684) with one else condition in my PHP code snippet. So my PHP code snippet will look something like the following:
<?php
$course_id = get_the_ID();
if ( $course_id == 10684 ) {
//show sib form 2 if course is free youtube course
echo do_shortcode('[sibwp_form id=2]');
} else {
//show sib form 3 for the blogger course
echo do_shortcode('[sibwp_form id=3]');
}
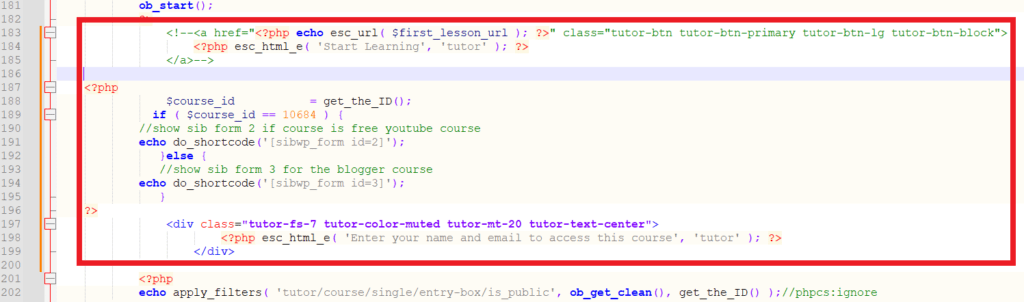
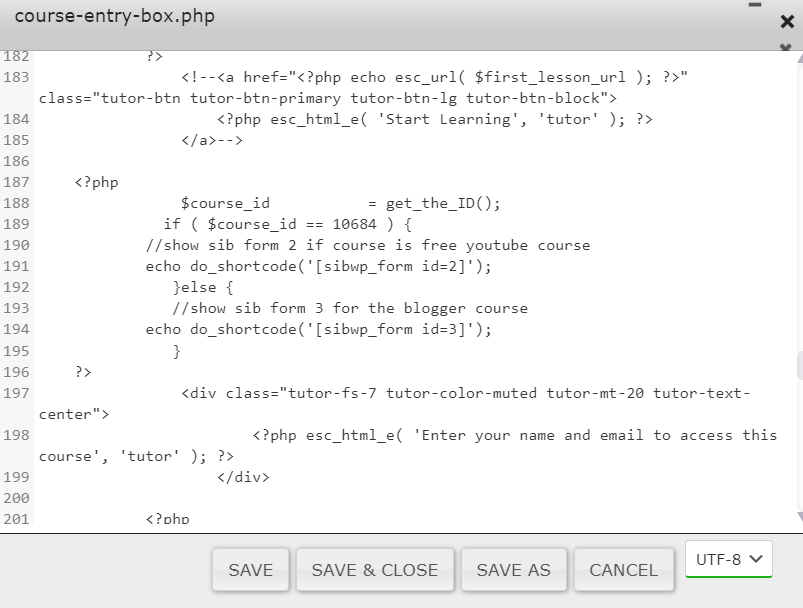
?>You can take it a little further and add a message just below or above the PHP code directing the user to enter his or her name and email address in the displayed subscription form.
<div class="tutor-fs-7 tutor-color-muted tutor-mt-20 tutor-text-center">

<?php esc_html_e( 'Enter your name and email to access this course', 'tutor' ); ?>

</div>
The changes made so far on your PHP file should look like the output in the image below.
You can then save the code. File Manager’s Code Editor sometimes doesn’t save codes with errors, which may break your website, so using the editor might be a safer bet. You can make the changes on your device notepad and then copy the codes and paste them into File Manager Code Editor before clicking the Save button. Do not Save & Close until you have confirmed the change worked and there are no errors. Or you could right-click away from the file names, select the Upload files option and upload your modified course-entry-box.php file, which will then overwrite the original existing PHP file.
Before going to the next step, take a look at your free courses in incognito mode and test the forms to see that they are working and redirecting appropriately. If all is good, then proceed to the next step.
How to Make Tutor LMS Free Public Courses Outlined Topics Non-Clickable
The next thing you want to do is to edit the course-topics.php file to make the links to the videos in the free public courses non-clickable. Following the same method as above, open the course-topics.php file in the Code Editor. Search for the following line of code:
$lesson_title .= "<a href='" . get_the_permalink() . "'> " . get_the_title() . ' </a>';
Replace it with the following lines of code:
//$lesson_title .= "<a href='" . get_the_permalink() . "'> " . get_the_title() . ' </a>';

if (( get_post_meta( $course_id, '_tutor_is_public_course', true ) == 'yes' && ! tutor_utils()->is_course_purchasable( $course_id ) ) ) {

$lesson_title .= get_the_title();

} else {

$lesson_title .= "<a href='" . get_the_permalink() . "'> " . get_the_title() . ' </a>';

}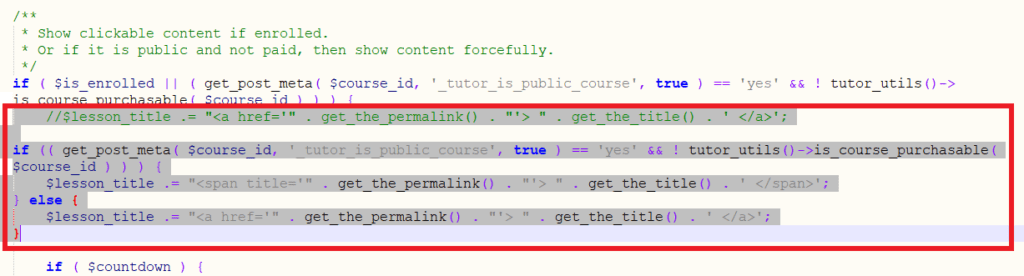
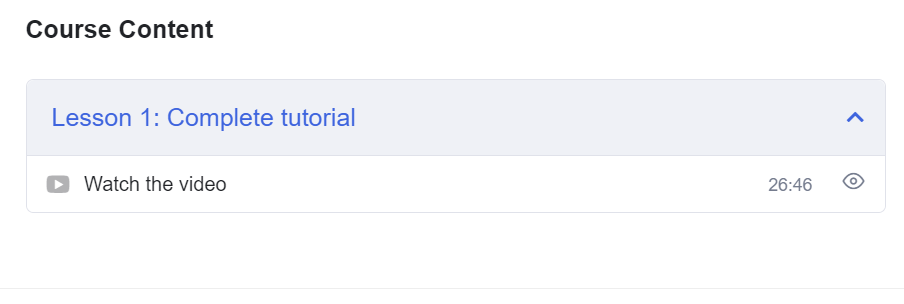
What this code does is it overrides the default option to make the link clickable to users already enrolled to a course as well as free public courses, and makes it clickable to only users enrolled and plain text (non-clickable) in free public courses. Save your changes and check the effect on your free public online courses. Here’s a quick example of what your free course topics should look like if you properly insert the code snippet:
Finally add the following CSS code to your website to remove the Start Learning buttons in free courses listed in the courses archive page.
.course-archive-page .tutor-card-footer {

    display: none;

}

.course-archive-page .tutor-card-footer {

    display: none;

}
That’s it for configuring the Tutor LMS plugin to replace the Start Learning buttons in free online courses with email subscription forms. If you implemented everything correctly up to this point, then you have successfully hidden your free public courses on Tutor LMS behind an email subscription wall. Now, no matter what, users have to subscribe to your email list before they can access your free online courses on Tutor LMS.
Wrapping Things Up
Tutor LMS is an awesome WordPress plugin that you can use to easily create an online course website in just a few hours and start making money online passively. The free version comes with a user-friendly interface and so many features compared to other free LMS WordPress plugins. In the free version of the Tutor LMS plugin, you can create an unlimited number of online courses and specify various prices and access to each of them. You can create, customize, manage, and sell online courses as well as challenging and fun quizzes, interactive lessons, powerful reports, and stats, making Tutor potentially the best free WordPress LMS plugin. And you get more add-on features if you upgrade to the premium version of Tutor LMS starting from $199/year.
Unlike other LMS WordPress plugins, you can easily modify and override Tutor LMS templates. In this tutorial, we explored how you can modify Tutor LMS templates to swap the Start Learning buttons in free public online courses with email subscription forms (using Brevo as a case study because of its flexibility) so you can use free video courses as lead magnets in building your email list and achieve your email marketing goals. If you get stuck at any point or have any queries about hiding free courses in Tutor LMS behind email sign-up forms by replacing the Start Learning buttons in free public online courses with email subscription forms, feel free to ask in the comment section below. I’m here to answer any questions you might have.